![]()
![]()
![]()
![]()
![]()
![]()
![]()
![]()
![]()
![]()
![]()
![]()
![]()
![]()
![]()
![]()
![]()
![]()
![]()
|
|
|
|
Carbon Fiber Driveshaft
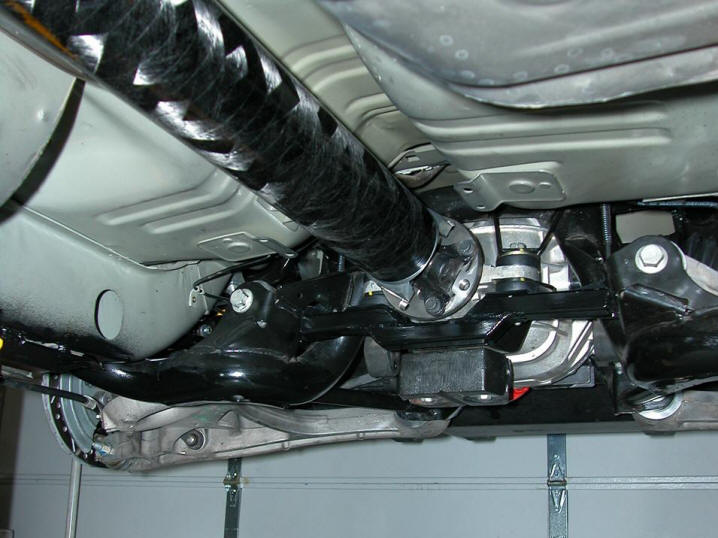
Reducing rotating mass - or more precisely, rotational inertia - can do wonders for a car's responsiveness, and replacing the heavy steel OEM driveshaft with a lighter aftermarket unit is a common upgrade among road racers. Most opt for aluminum shafts, because they're reasonably inexpensive, but carbon fiber shafts, while pricey, offer not only the lowest inertia, but the added benefit of vibration and shock damping, as well. After a doing bit of digging, I decided to have Mark at Precision Shaft Technologies build me a custom carbon fiber unit, and the driveshaft was already on order in 2002 when I took Taz down to the local alignment shop. It occurred to me while watching the alignment techs at work that these guys could perform a driveshaft swap in no time flat with their lifts and air tools. Back then, I didn't yet have my own air tools, so it would have taken me half a day on my back, with the car sitting on jack stands, to perform that swap. I asked the techs if they were interested in making a few extra bucks installing a new driveshaft for me. They were, and the crew at Network Alignment performed the swap in less than 20 minutes after the new part arrived. The photo below shows the PST driveshaft following installation. In this shot, you can also see part of the Ford Racing FR500 catback, and a portion of the Kenny Brown Extreme Matrix chassis reinforcement system:
NOTE: The installation of a Ford Racing T-56 transmission required the replacement of this driveshaft with a shorter one. Naturally, I opted for a similar PST unit.
MM Clutch Quadrant & Firewall Cable Adjuster
About the time I ordered my twin-screw kit, I decided it was time to replace the plastic OEM clutch quadrant with the recently released Maximum Motorsports aluminum clutch quadrant and firewall adjuster. Like everything else I've purchased from MM, these parts were of the highest quality, and the installation instructions were excellent. The entire procedure took only about 30 minutes. I shot no photos during the brief installation process, but here are a couple photos of the parts, the MMCL-6 quadrant and MMCL-3 firewall adjuster, that I lifted from the Max Motorsports instruction sheets.
Opinions regarding the correct adjustment of an aftermarket quadrant and firewall cable adjuster vary widely. Most are wrong and result in premature failure of the release bearing, clutch, or worse. Jack Hidley of Max Motorsports has offered the following insight on the topic: "Proper adjustment of the clutch cable tension in a Mustang is important to give proper clutch feel, and to avoid premature failure of the throw-out bearing, clutch disk, or crankshaft thrust bearing in the engine. Contrary to popular opinion, the clutch cable in a 79-04 Mustang, when properly adjusted, is designed to have some tension on it, keeping the throw-out bearing in constant contact with the fingers on the clutch pressure plate. This slight preload is designed to keep the throw-out bearing centered with the pressure plate, minimize noise, and improve clutch pedal feel. "One common myth is that constant throw-out bearing contact will lead to throw-out bearing failure. This is true of older mechanical linkage clutch activation systems or any other type of non-self-adjusting system that is not periodically adjusted, especially ones that don’t use an angular contact throw-out bearing. The Mustang angular contact throw-out bearing was designed to be in constant contact with the clutch cover’s diaphragm fingers. As the clutch friction disc wears, the outer end of the pressure plate diaphragm fingers move towards the engine. Since the pressure plate diaphragm fingers are small levers, the opposite end of them, the end at the throw out bearing, moves in the opposite direction as the clutch wears. This direction is towards the throw-out bearing. If the clutch is adjusted so that when new, the throw-out bearing is just touching the clutch pressure plate fingers, as it wears the throw-out bearing will push on the clutch fingers more and more. This causes an increasing load on the throw-out bearing and the crankshaft thrust bearing, and causes the clutch to be partially disengaged all the time. This also reduces the clutch’s torque capacity and can lead to slipping. If periodic adjustment is not made to the preload on the clutch fingers, early failure of the clutch will occur." The emphasis in the above statement is mine, because I believe it is a key concept that most have lost sight of among the incessant flow of hype, folklore, and misconception. Ford didn't "forget" to fit the clutch fork with a return spring to pull the release bearing away from the pressure plate diaphragm when the clutch pedal is released. Ford wants the bearing to remain in contact with the diaphragm. Any installation that runs contrary to this design concept is an installation doomed to premature failure. The second critical bit of information in Jack's statement is the importance of periodic cable tension adjustment as the clutch disc wears throughout its service life. As the disc wears, increased pressure on the release bearing must be compensated for by releasing a little tension with the firewall cable adjuster. This isn't a "set it and forget it" system. It's the owner's responsibility to periodically check and adjust it to retain optimal performance.
Taz Gets a Girdle
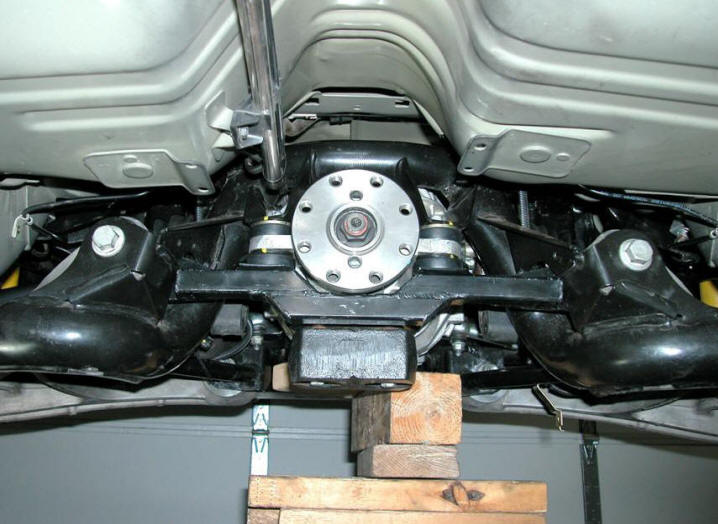
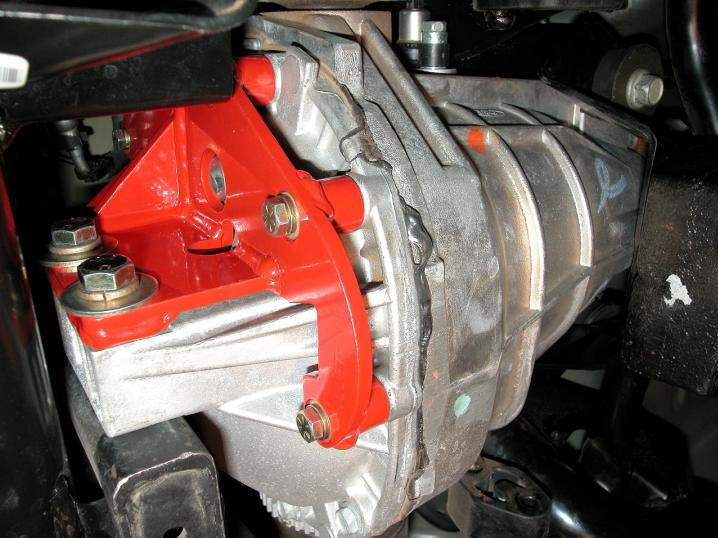
The Kenne Bell announcement that development would resume on a twin-screw kit for the '99/'01 Cobras coincided with a solicitation by Mark Chiappetta of Zone 5 Performance for pre-production deposits on a differential cover brace that he was developing. Mark, being the owner of an Eaton-supercharged Terminator Cobra, had become concerned about the rear cover failures being reported by other Terminator owners, and he decided to see what he could do to minimize the possibility of the same sort of failure occurring on his own car. Mark had begun experimenting with a brace design that Joe Lynch had built for himself while he was still running an IRS on his '99 Cobra. Mark made a few changes that he thought might improve the part, and when he reached the prototype stage of development, he put together an attractive pre-launch group purchase, just as he had done with his MAFterburner. Since all 8.8" 1999 - 2004 Cobra rear ends are essentially identical, and because I was anticipating making somewhat more power than a stock Terminator, I jumped into Mark's group purchase with both feet. In fact, I was the sixth person to throw down a deposit, and Taz was sporting his own brace before his compressor ever saw boost. Here's a photo of the part taken from below, after I had installed it.
Doug at BilletFlow produced the part after Mark had completed his prototype testing. This IRS brace has been very successful in preventing broken housing covers. The brace not only performs it's job as advertised, the production part is a beautifully finished piece. In fact, it looks so good that I'm half tempted to buy a second brace one of these days and have it encased in Lucite block as a conversation piece.
2006 - 2007 Drivetrain Upgrades
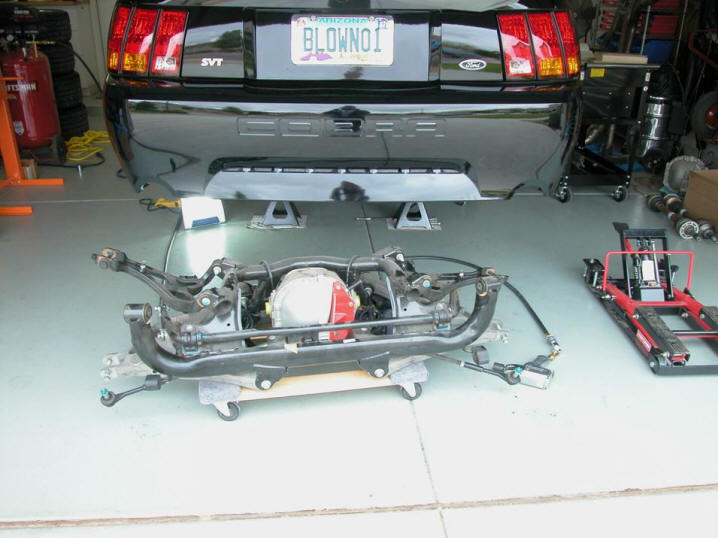
Between late 2006 and early 2007, in addition to installing numerous suspension upgrades, I made extensive improvements to the Cobra's drivetrain. The teardown process necessary to prepare the Cobra to receive all of the new parts required stripping everything from the underside of the car from the crankshaft back. By the time I had finished, poor Taz looked like a gutted animal when viewed from beneath. NOTE: For those seeking a solution to the IRS Cobra's wheel hop during hard launches, I have published the elusive SILVER BULLET HERE on the Tech Docs page of this site. If you really want to stop the hop without ruining your car's handling and/or ride quality, give it a read.
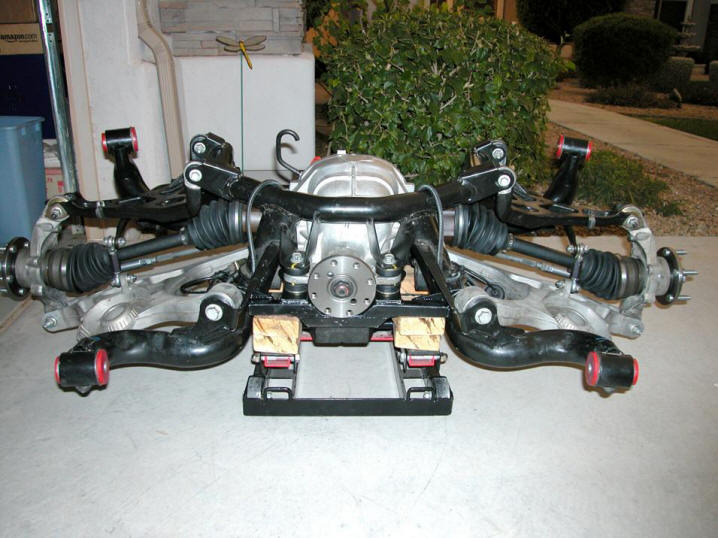
Part of the teardown process involved dropping the IRS subframe, and the first of the two photos above shows the cradle assembly (sans knuckles and halfshafts) immediately after removal. The second shot, directly above, shows the upgraded assembly ready to be reinstalled. Read on to see what transpired between these two photos, along with details about all the other drivetrain modifications performed as part of this project. The following sections contain all the 2006 - 2007 drivetrain upgrades, beginning at the flywheel and working back. Editorial Comment: To all of you knuckle draggers who whined and bitched about every perceived deficiency of the '99 - '04 Cobra's IRS design, both real and imaginary, especially those of you who were actually RETARDED enough to swap your IRS Cobras over to SRA rear ends, I have just one thing to say: DIE!!! I suppose all you beer-bellied, tattooed, trailer court refugees are proud of yourselves. After all, you managed to send a clear message to Dearborn that Mustang buyers, as a whole, weren't quite ready for such newfangled contraptions as independent rear suspensions. Just when the entire Mustang line was poised to transcend the prehistoric stick axle with which it had been cursed since its inception a half-century before, you Neanderthals and all your carping about the IRS Cobra's shortcomings at the drag strip convinced the folks at Ford that they didn't really need to spend the money to modernize S-197's suspension. Consequently, the next iteration Mustang was fitted with a stick axle platform, rather than the Dew Lite IRS for which it had been designed. For the entire decade of the S-197's production, Mustang buyers were once again relegated to cars with Conestoga axles, thanks, in no small part, to all of you morons. Well done. I'm not saying that I believe the SVT Cobra's IRS, as delivered from the factory, was ideal. The design was arguably compromised by cost considerations and various corporate edicts. Nevertheless, it WAS light-years ahead of the wagon axles with which lesser Mustangs of the time were cursed. Compared to its live axle counterparts, an IRS Cobra offered better F/R vehicle weight balance and significantly lower unsprung weight out back. It also provided a great starting point for building a world-class handling monster. Early on, many suggested that the Cobra's IRS couldn't be made to perform exceptionally well because of the restriction that it be a bolt-on substitute suspension for a single sub-model within the Mustang lineup. In retrospect, this opinion has been revealed for the rubbish that it was. An IRS is by nature a separate, self-contained subassembly. How it attaches to the vehicle is irrelevant. The important aspect is how well it performs, and SVT's suspension engineers came up with an excellent solution, especially considering the cost, NVH, and other constraints under which they labored. A bit of bushing recalibration, a few other minor tweaks, and one had himself a great little canyon carver. Thankfully, the S-197 is finally dead, and the next generation Mustang - the S-550 - will be equipped with an IRS across the board. Ford has finally come to the realization that the vast majority of potential Mustang buyers are far more interested in ride quality and handling than in launching their cars hard on drag radials or ET Streets, and has driven a stake through the unholy heart of the stick axle Mustang. This evolution is long overdue, but better late than never, and the Luddites among us will just have to live with it.
Terminator Flywheel-Clutch-PP
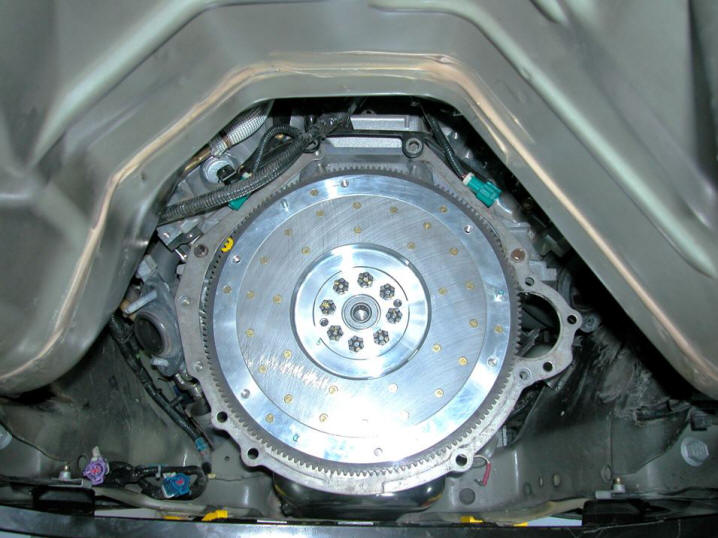
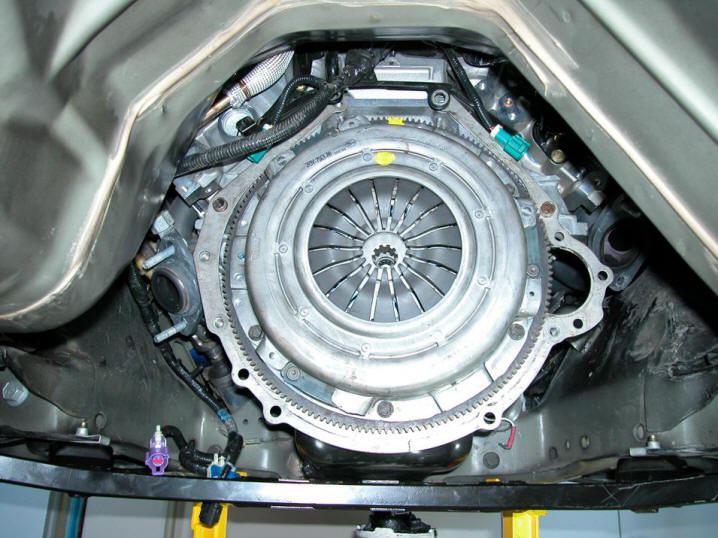
Although they continued to hold up fairly well after the twin-screw installation, Taz's stock clutch and pressure plate hadn't been designed to handle the torque that a force-fed Ford modular motor can produce. I began to notice some intermittent slipping behind the blower, so I was already planning on replacing the OEM parts when I fell into a sweet deal on a complete Terminator clutch kit, which also included an aluminum flywheel. Since the lightweight flywheel would assist in reducing the driveline's rotational mass, I snapped it up. Afterward, these parts sat in my garage in their original shipping carton for more than a year and a half. But that's okay. They're car parts not foodstuff, so they hadn't "spoiled" before I got around to installing them. The reason for the delay was that I had been kicking around the idea of buying a Ford Racing 6-speed transmission for the Cobra and didn't want to replace the stock clutch until I had come to a decision, one way or the other, about replacing the car's stock 5-speed. No sense in reinstalling the 5-speed if I was going to replace it, anyway. Eventually, I decided to add the 6-speed to my 2006 drivetrain upgrades and finished procuring all the various parts. After first removing the entire driveline, I worked my way from front to back underneath the car installing all new parts, beginning with the flywheel. Below is a photo of the new flywheel, and below that the clutch-PP assembly following their installations.
The flywheel/clutch/pressure plate swap was entirely straightforward, thanks to the Ford service manuals that my that friend Roy had given me and the technical advice, moral support, and wrenching assistance provided by my buddy Jim. Thanks, guys. You both contributed immeasurably to Taz's rather extensive 2006 - 2007 upgrades. TECH TIP: These cars were equipped by Ford with non-standard 11" clutch disks and pressure plates. The thickness of the OEM 11" disk is only .270" on these cars vs. the standard Ford .310" thickness, and the pressure plate was designed for this non-standard disc thickness. If you replace your clutch disc with a standard .310" thick disc, you'll need to install a shim between your pressure plate and the flywheel to enable the pressure plate to function properly with the .310" thick disk. TECH TIP: The installation of any pressure plate that alters the fore/aft position of the diaphragm from the stock location should be accompanied by the installation of an adjustable pivot ball to enable proper alignment of the clutch fork. Shifting the diaphragm either forward toward the engine or back toward the transmission is accompanied by changes to the fork angle, and adjustments to the pivot stud length may be required to restore the fork's full range of motion. Refer to the diagrams in THIS document for a graphical depiction of the issues that can arise from incorrect pivot stud lengths. TECH TIP: I have it on good authority that McLeod manufactures the Ford Racing and Terminator aluminum flywheels and will replace their friction discs for a nominal fee (about a hundred bucks apiece). These are great flywheels. They're as light and strong as any around. If you own one with a worn friction surface, why buy a whole new aluminum flywheel when you can have yours refurbished for less than 1/3 the price? Editorial Comment: Tradeoffs. All things automotive involve tradeoffs, and we all have different priorities. That's why there's no "best" anything. The best choice for a dedicated track car isn't usually the wisest one for a street car. Similarly, the ideal products for road racers certainly aren't the best picks for drag racers or for anyone building a boulevard cruiser. With regard to drivelines, minimizing rotational inertia has always been the Holy Grail for road racers, but this is generally considered to be counterproductive among quarter-milers and those in search of the smoothest power delivery. Those of us addicted to the twisties are always looking to maximize our cars' responsiveness, and removing driveline hysteresis by minimizing rotational inertia plays a significant role in that quest. Reducing driveline inertia enables our vehicles to respond more immediately to both modulation of the loud pedal and application of the binders. But there's a down side. By virtue of their heightened reflexes, our cars become more difficult to drive smoothly in traffic. There's less spinning mass behind our motors, so they don't store up much kinetic energy to retain RPM the way heavier components will. This makes them trickier to drive. Reduced rotational inertia is a deficit for drag racers, as well, because those big clutch dumps pack far less punch with significantly lightened drivelines than they do with heavier components. What all this boils down to is that the components you select for yourself need to match the goals you've established for your car. For most folks (anyone other than us loonies harboring fantasies of becoming the world's next great F1 superstars), heavier driveline components generally should get the nod over lighter ones when upgrading. A car with a billet steel flywheel and steel driveshaft will not only deliver a much harder hit behind a big clutch dump, it will also provide much smoother performance in stop-and-go street driving than one with a lightweight driveline. Lightweight components are desirable for only those seeking hair trigger reflexes, so don't rush out to the garage and install an aluminum flywheel just because I did. This admonition applies to every single change you make to your car. Think for yourself. Determine your own needs based on your own priorities, and map out your own path to your goals. Don't become a "parts lemming," blindly throwing parts at your car just because some yo-yos on the Internet did and claim they're the greatest automotive improvements since pneumatic tires. If you do, you'll likely end up terribly disappointed and frustrated.
Ford Racing T-56 Transmission
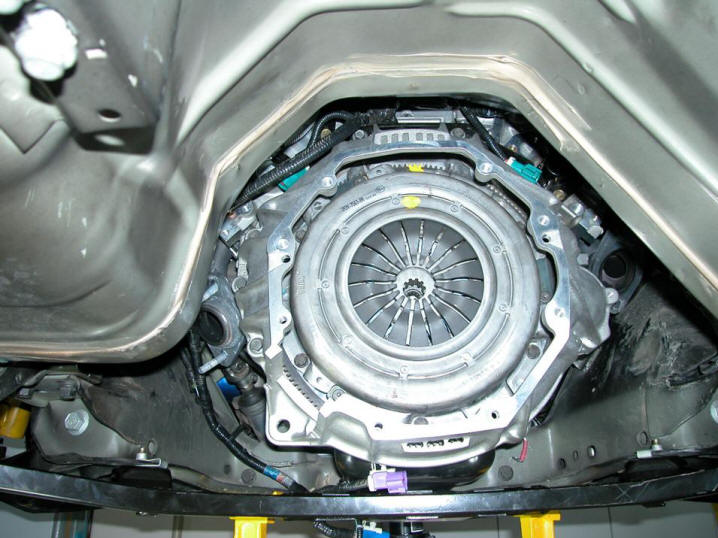
I spent years thinking about a 6-speed for Taz before finally pulling the trigger on this upgrade, but with the OEM 5-speed, I could never shake the feeling that I was missing a gear between its 1:1 fourth and tall overdrive 5th. The 00R-spec Tremec T-56 with which I finally replaced the factory 5-speed addressed that issue by sandwiching a performance ratio short overdrive 5th (0.80) between a 1:1 fourth and 0.62 sixth. Perfect. After spending a lot of time agonizing over the cost, I added a brand new Ford Racing T-56 transmission and crossmember to my other 2006 - 2007 upgrades. The good folks at Southwest Ford in Weatherford, TX offered what I wanted at competitive pricing and were even kind enough to save me the shipping costs by having the parts drop-shipped directly from Ford Racing to me. Considering the size and weight of a crated T-56 transmission, that's no trivial savings. Although I could have had a rebuilt Terminator take-out for considerably less than the Ford Racing 00R-spec unit set me back, I decided to spend the extra money. Among other things, the Terminator-spec T-56 lacked the gear ratios that I wanted, as well as a 31-spline output shaft (the Terminator's was 27-spline). As for the even more expensive Viper-specT-56, it's geared tall like the Terminator transmission in first through third, and its overdrive gearing is even taller, with a 0.50 sixth gear. If you're making HUGE torque and/or have an extremely short rear end, like a 4.56, then a Viper-spec may make sense for you, but its only real advantage over the 00R-spec unit is its enormous torque capacity. And with the advent of the T-56 Magnum, you no longer need to choose between gearing and torque capacity, so why bother? TECH TIP: If you are considering upgrading to a 6-speed transmission, be aware that several different T-56 variations are available, and there are numerous differences, large and small, among them. One of the biggest is gearing. Even for a motor with respectable low end grunt, a 2.66 first gear makes for a rather doggy hole shot, and a 2.66 is all the Terminator-spec transmission brings to the table. By comparison, the 00R-spec transmission (Tremec model number TUET-1260) is equipped with a 2.97 first gear, and since 2nd and 3rd gears are also shorter in the 00R, this transmission is much better suited for spirited driving. To provide a visual of these differences, I created a graph comparing the overall mechanical advantages of the 00R and Terminator-spec T-56 transmissions, both driving 3.73:1 ring and pinion sets. I also included a Terminator T-56 mated to the stock 03/04 Cobra 3.55:1 rear end as a baseline. Click HERE to view the graph. Let's put that first gear difference into perspective: a 2.97 first coupled to a 3.73 rear end actually provides a BETTER overall mechanical advantage than a 2.66 first driving a 4.10 ring and pinion set. Don't take my word for it; do the math yourself. What's that you say? Don't know how? No worries. Just use the Tire & Drivetrain Calculators on this site's Tech Docs page to work it out. As you can see in the photos below, the new T-56 bellhousing bolted right up, as did the transmission and crossmember. Some New Edge Cobra owners have reported having to clearance the passenger side of the transmission tunnel to accommodate a T-56, but I did not experience any fitment problem with my new tranny. I suppose all the assembly line tolerances just stacked up in my favor on this one.
As for energizing the T-56's REVERSE lockout solenoid, by the time I got around to bolting up the new transmission, I had already installed a switched 12V circuit and wired it through a momentary contact button in a new shift knob, so the REVERSE lockout circuit was handled. The only unforeseen issues that I ran into during the transmission swap were that (1) the bosses for the wiring harness's push pins were spaced differently on the new transmission from those on the TR-3650, and (2) the BACKUP lamp switch was located on the passenger side of the new 6-speed, as opposed to its driver side location on the 3650. Not a big deal. It was easy to alleviate the first issue by removing some of the wrap from the wiring loom, moving the push pins to the correct locations, and re-wrapping the loom. To address the second issue, I split the BACKUP lamp wires out of the wiring loom far enough back to enable them to reach the new location. Then, I finished up the electrical work with some fresh flex loom and a complete wrap with some Stretch & Seal self-sealing silicone tape. (Incidentally, if you haven't yet tried this tape, do yourself a favor and pick up a roll to try out. It's pricey, but it's light years ahead of any vinyl electrical tape. The stuff is available on the plumbing aisle of your local Home Depot.) TECH TIP: Here's a tip for you regarding transmission fluid. If your car's T-56 tends to be notchy or balky when shifting or refuses to shift smoothly at high RPM, and it was manufactured after 1999, try switching to Pennzoil Synchromesh, available at many auto parts stores for about $7 per quart. I have switched over to Synchromesh in my own T-56, and the stuff has made a significant improvement in smoothness when shifting, particularly when the transmission is cold. If your transmission was built before 1999, you might want to investigate further before switching. Some of the older T-56 units use blocker rings that don't take kindly to the Synchromesh formulation. I realize that there's a big orange sticker (visible in the photo above) on the driver side of my transmission case that advises using only DEXRON III fluid, but I've contacted Tremec directly and asked what the manufacturer recommends. I received the following reply to my inquiry (the emphasis is mine): "Thank you for your interest in the Tremec product line. I am sure that you are enjoying your new T-56. We recommend the Synchromesh fluid produced by Pennzoil. This is the best fluid to use in your transmission. Please contact us if you require further assistance." For years, there has been an ongoing debate regarding (1) which alternative fluid might be better than Dexron III, (2) whether or not the use of an alternate would result in accelerated wear or premature failure, and (3) if any of these alternate lubricants is endorsed by Tremec. The reply I received answers all those questions very succinctly. Yes, Dexron III is listed as the recommended fluid for the T-56 on Tremec's FAQ page at the company's website, and has been so listed forever. Of course it is. That recommendation makes sense politically. (Think about it.) The reply I received is the straight scoop from a technical, rather than political, standpoint. One last point: many believe that the Pennzoil and GM Synchromesh formulations are identical. They are not, and Pennzoil will tell you they aren't if you care to ask. Here's the response another Synchromesh user received in response to his question about the interchangeability of the formulas (again, the emphasis is mine): The synchromesh fluid that Pennzoil-Quaker State makes meets the warranty and performance requirements of the GM 12345349 part number for your application. It is not the same fluid that is in the GM synchromesh fluid package, so you can make your purchase choice based on price if you choose. If you have any other questions or comments, please contact us at 1-800-458-4998, M thru F, 8am to 5pm, CST. So there you have it, straight from the horse's mouth. No hearsay, no guessing, no Oji board messages from beyond the veil. They're different formulas. I have no firsthand experience with the GM formula, so I cannot say whether or not that product offers any real advantage in a T-56 transmission. I bought the Pennzoil formula, as recommended, and have no intention of spending significantly more money for the GM product until I have it on good authority that the GM formula is tangibly better. NOTE: A few years after I installed Taz's T-56, Tremec replaced it with an even stronger 6-speed unit, the TR-6060 (also referred to as the T-56 Magnum). This transmission is available with your choice of gearing and is rated to handle up to 700 lb-ft of torque. If I ever bump up Taz's power beyond what the 00R T-56 will handle, which isn't likely, I'll swap in one of these new transmissions.
MGW Shifter
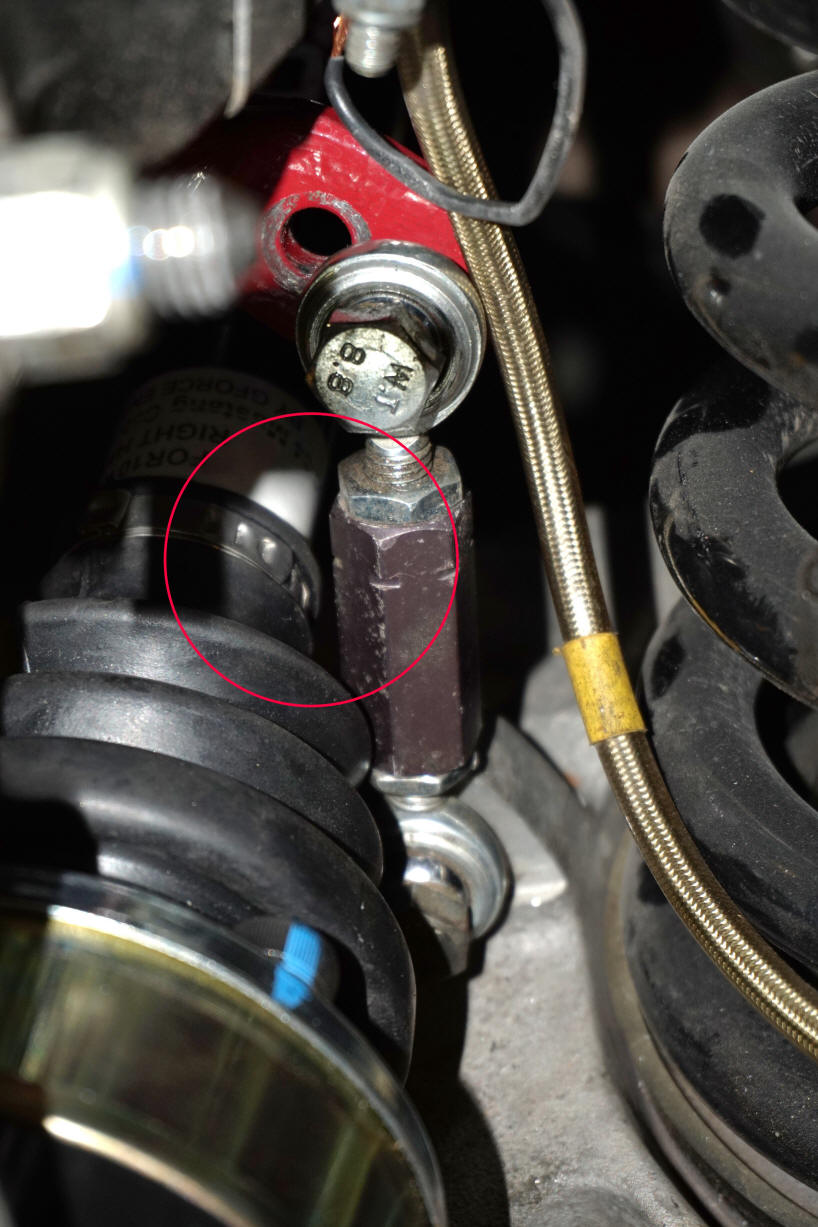
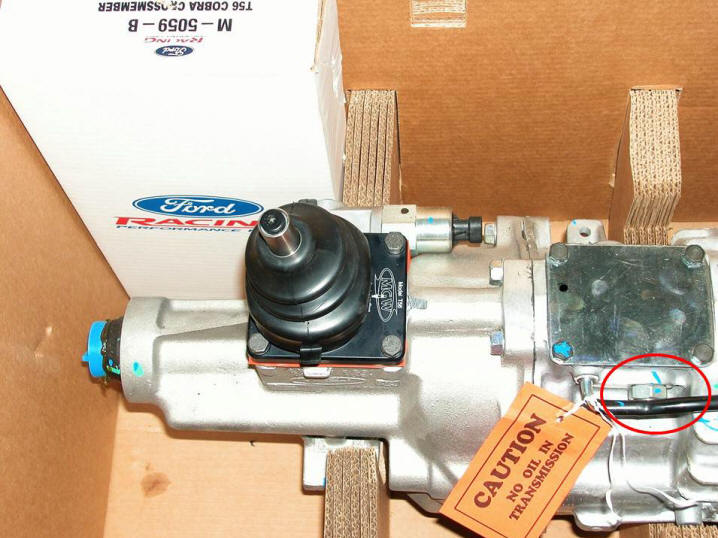
The shifter supplied with the Ford Racing T-56 was about the same quality as a stock TR3650 shifter. Feel free to draw your own inferences from that statement. Except for its uncanny ability to transmit noise, I had been very happy with the Steeda Tri-Ax that I'd used with my 3650, so I was planning on picking up another Tri-Ax for the new transmission. However, my friend Roy had switched to an MGW shifter and suggested that I try one of those with the T-56, so I did, and I'm genuinely glad. I've heard that the T-56 is extremely noisy with a Tri-Ax, but my transmission is quiet with the MGW. More importantly, the MGW's unique design enables me to position the handle exactly where it works best for me. George and the crew at MGW get two thumbs up for this one. This is what the shifter's base looks like when bolted to the T-56:
Circled in red above is the transmission's shift detent bolt. Many owners insert one or two copper washers there to relieve detent pressure for easier shifting. I have not yet tried this, but my friend Jim has performed this modification on his D&D Viper-spec T-56, and he likes the results. I will reserve judgment until after I have driven his car. The photo below shows the OEM outer boot being fitted to the MGW riser during installation. (Pay no attention to the rat's nest of non-standard electrical harnesses around the shifter.)
TECH TIP: When installing any aftermarket shifter on a T-56, remove the shifter's Stop Bolts. The T-56 doesn't need them, and leaving them attached to the shifter can damage the transmission if the bolts aren't backed out far enough. You don't need to accept my word with respect to this advice. Here are a few words directly from the transmission manufacturer's website (the emphasis is mine): "The major problem with aftermarket shifters is that they have stops on them. To install them correctly, you will have to remove the stops completely. Our transmissions are built with internal stops." That should be clear enough for even the most intellectually challenged out there in Internet Land. Here's a shot of the completed shifter installation, including a MOMO airmetal & leather shift knob (selected to match the previously installed E-brake handle). I modified this knob by adding a momentary-contact pushbutton to its top center for the transmission's REVERSE solenoid. Since the knob bears no shift pattern, I added an aluminum placard containing the T-56 pattern to the base of the center stack, just beyond the billet shifter bezel, for those rare occasions when I am forced to allow someone unfamiliar with Taz to pilot him.
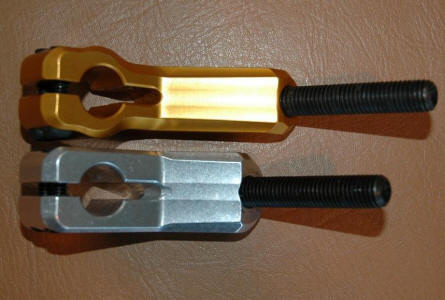
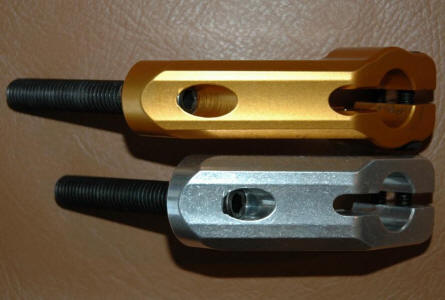
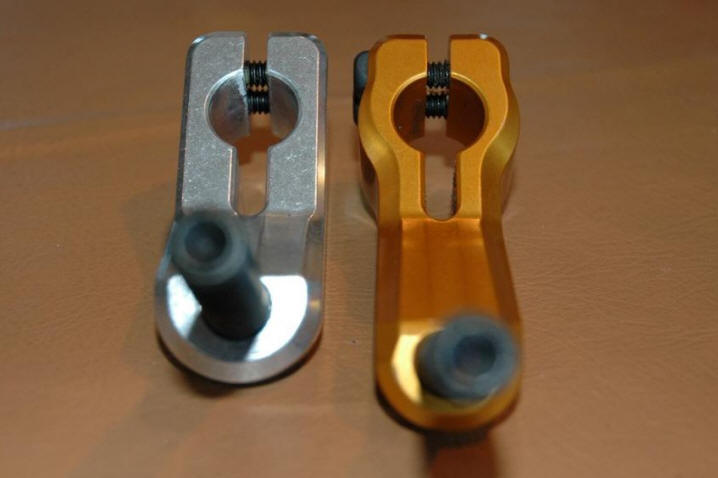
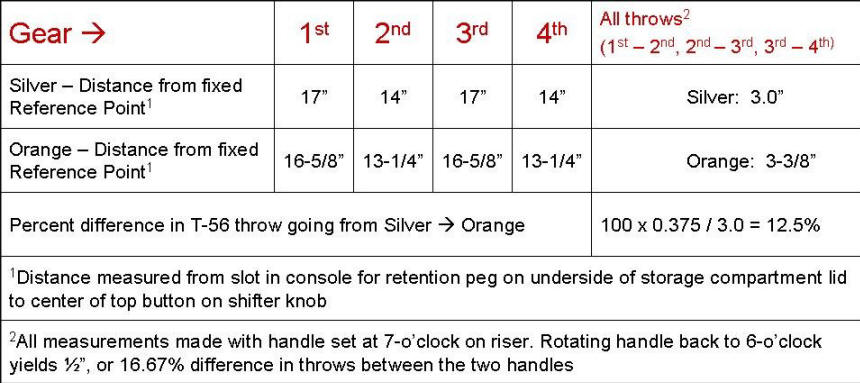
I also wired an amber 12V LED indicator into the solenoid's power circuit and mounted the LED just to the right of the "R" on the shift placard to indicate when the REVERSE solenoid is energized. This LED is visible in the above photo between the placard and cigarette lighter. TECH TIP: Every shift knob that uses set screws to secure it to the shifter handle invariably sits cockeyed and continually requires retightening. Momo knobs are typical examples, but I have devised an effective remedy. First, throw the set screws in the trash. Then, pick up some suitable diameter ASTM tubing at your local Home Depot, cut it to length, and press it into the neck of the shift knob (5/8" OD was the right size tubing for mine). Finally, after you have pressed the ASTM sleeve into place, tap it with the correct thread for your handle. This transforms the knob into a twist-on design that sits evenly on your shifter handle and doesn't need to be retightened every few days. 2011 Update: MGW eventually released a silver handle that was somewhat shorter than the orange one with which my shifter had been originally supplied. I've always preferred the shortest throw shifter I could find, so I decided to try the silver one, and I genuinely love it. As far as I'm concerned, the MGW shifter with this handle is as near to perfect as any shifter has ever been. However, I'm endowed with the "classic" Italian physique of relatively long arms and short legs, which makes every gear an easy reach for me when the seat is adjusted properly for good pedal work. Your mileage may vary. Depending on your build, the silver handle may not be a good choice for you. Here are a few photos of the orange and silver handles side by side. These photos dramatically depict the physical differences between the two. The specified 1/2" difference in length doesn't sound like much, but when you see it in relation to the overall size and geometry of the piece, the significance becomes readily apparent.
Of course the most important difference between the two parts is the difference in the length of their throws from gear to gear. I measured both and created the chart below for reference. Note that even with the handles rotated to the 7-o'clock position on the shifter's post, switching from the silver handle to the orange handle increases the throw by 12.5%. That is significant, and with the handles adjusted to the 6 o'clock position, the difference grows to 1/2", or 16.67%.
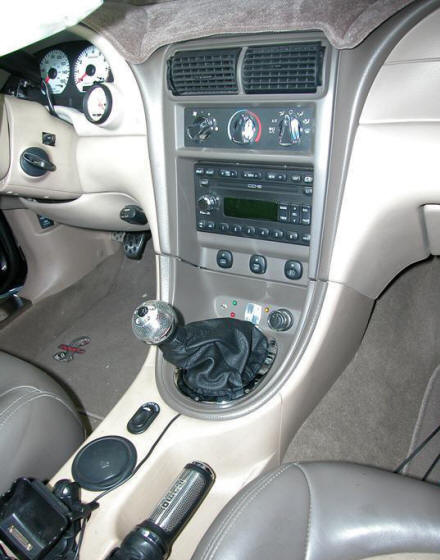
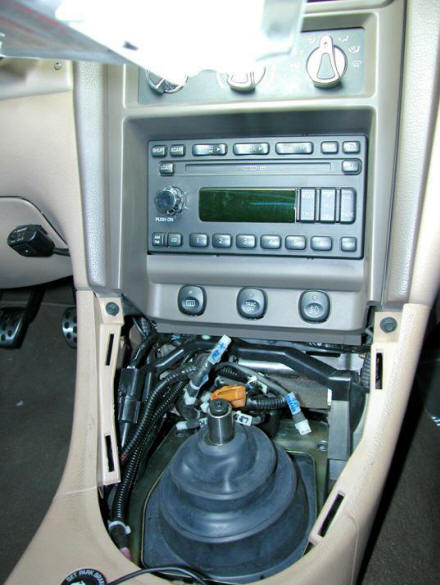
Below is a 2012 interior shot to give you an idea of the way the MGW sits in Taz's console with the silver handle installed. The transmission is in neutral.
2014 Update: This handle design has been discontinued. MGW has replaced it with a double-articulated design offering enhanced adjustability. I have not tried one of the new handles and probably never will, since I am perfectly content with my setup, so I cannot comment on how the new design compares with my own regarding reach and throw.
Second Carbon Fiber Driveshaft
Before I ordered my 6-speed transmission, I had heard that it was possible to upgrade a New Edge Cobra from the OEM 5-speed to a T-56 without replacing the original driveshaft with a shorter one, despite the T-56 being about an inch longer. The limited movement of the carrier in the IRS supposedly made this a possibility, because the slip tube requires practically no play in this application, and the center-to-center distance between the U-joints was short enough to enable the driveshaft to fit. All that was typically necessary was to lop off about 3/4" from the end of the slip tube to ensure that it didn't bottom out inside the transmission's tail housing. Encouraged by this information, I ordered my T-56, without really considering the fact that I no longer had an OEM driveshaft. My PST driveshaft had been custom built and was slightly longer between the U-joints than the OEM part had been. The PST no longer fit with the new tranny bolted up, and it couldn't be shortened due to its construction. On the other hand, considering how flawlessly my PST had performed, I wasn't about to settle for a lesser unit, so I called Mark at PST and asked him to hook me up with another driveshaft just like the one I had, except built to fit a Terminator. The new shaft was beautiful - a perfect blend of art and technology. Kudos to PST. Mark built exactly what I had asked for. Unfortunately, even though I knew long before I ever picked up the phone to order the new D/S that a Terminator T-56 is equipped with a 27-spline output shaft, while my 00R-spec Ford Racing transmission had been built with a 31-spline output, I asked for a "driveshaft for a Terminator," so that's what I got. This "senior moment" worked out to a roughly $100 mistake. Not so bad in the scheme of things, considering the overall expense for this round of driveline upgrades. Anyway, rather than ship the driveshaft all the way back to PST for Mark to retrofit with the correct slip tube, I had the capable folks at Arizona Driveshaft Service (back then, it was Mesa Driveshaft) install the right part. Below, you can see my second carbon fiber DS bolted to the Terminator pinion flange on the new differential (detailed below). At least the driveshaft's companion matched up with my new pinion flange, thanks to a glitch in the Ford parts system. More on that later.
As you can see, I no longer need a wobble socket or a gear wrench to turn the 12-point bolts securing the companion to the pinion flange, because the bolt hole spacing is much wider on the Terminator flange than it was on my stock '01 Cobra flange. TECH TIP: For the smoothest transmission of power and maximum U-joint life in an IRS car, the pinion angle should be set equal and opposite to the angle of the transmission's tail shaft. The engines and transmissions in these cars are usually installed with the transmission tail housings tilted down by about 3 degrees (-3 degrees). If your car is typical, your pumpkin should be adjusted to present a 3-degree upward angle to offset this. However, your car may be atypical, so use an angle finder to obtain exact measurements. Use shims, where necessary, to adjust the transmission and/or the carrier housing so their angles offset each other within a degree or less.
Ford Racing Gears & Torsen T2R
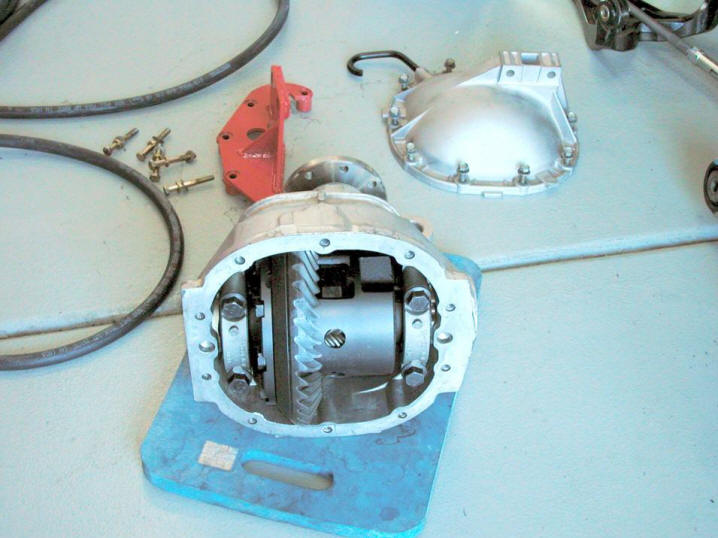
Although the 00R-spec T-56 is endowed with a shorter first gear than a Terminator T-56, its 2.97:1 first is still somewhat taller than the 3.37 first gear of the TR-3650 transmission. After installing the twin-screw, I had been very satisfied with the way the car pulled in first with the 3650 and stock 3.27 ring and pinion gears, so I wasn't looking for any more gear in first, but I wasn't keen on the thought of any less, either. New ring and pinion gears were in order. My trusty gear calculator indicated that a set of 3:73's coupled to a Ford Racing T-56 would offer identical overall gearing in 1st and somewhat shorter gearing in 2nd through 5th than the original ring and pinion had provided with the 3650. That was exactly what I wanted. My buddy Jim offered to purchase the gears for me and set them up, along with the new Torsen T2R differential that I had recently purchased, in exchange for a fiberglass hood he wanted that had been sitting in my garage. I had no real need for the hood, so I accepted his offer. In the photo below, you can see the new ring gear and differential installed in a second 8.8" housing, which Jim was also kind enough to supply for the project.
TECH TIP: If you ever have occasion to order a new 2001 Cobra pinion flange, you should be aware that you may end up, instead, with a Terminator pinion flange, as I did. Although my new part came in a box bearing a Ford Parts label that read "2001 Cobra," that simply wasn't so. There apparently is - or at least was at that time - a glitch in the Ford parts numbering system, as others have reported the same experience, and one of the guys at Southwest Ford told me that his parts catalog listed the same part number for all Cobras from 2001 through 2004. This is incorrect, but not necessarily a bad thing. The Terminator flanges are stronger than their '01 counterparts, and the runout issues that had plagued the '99 and '01 parts, exacerbating vibration issues, have been absent from the newer flanges, as well. Nonetheless, to fit the larger pinion flange, you will also need to install a newer style companion on your driveshaft if you have been running the smaller flange. With respect to the above Tech Tip, the part number snafu turned out for the best in my case, because my second PST driveshaft had been constructed to mate with a Terminator pinion flange. The photo below shows the new pinion flange installed along with a Paul's High Performance pinion brace and poly front bushings for the 3rd member. Naturally, when I installed the PHP bushings in front, I also swapped out the housing's rear bushing for a Max Motorsports MMIRSB-46 urethane replacement to avoid a durometer difference between the front and rear.
After I began open-tracking my Cobra, I noticed that the pumpkin had started spitting a bit of gear oil out its vent tube, and a little oil had begun to seep out between the case and the cover. These were clear indicators that my OEM Trac-Lok was getting too hot on the road course, and I needed to do something about it before things got worse. I had heard and read so many positive reviews of the Torsen T2R Racemaster with respect to its on-track performance, reliability, and consistency that I added one to my 2006 - 2007 drivetrain upgrade list. Years later, my T2R continues to live up to its reputation, so I have been very pleased with my choice. The Torsen is a worm gear, constant mesh, limited-slip differential. Although the T2R's web page description mentions that some applications use clutch plates, and clutches are even depicted in the exploded view on that page, the T2R manufactured for the IRS Cobra is not equipped with clutches, so it requires no periodic maintenance other than oil changes. Much more importantly, the Torsen runs significantly cooler than the Trac-Loc it replaces - cool enough that I don't feel the need to add an external diff cooler for road course duty. If I were racing the car, I'd probably add a cooler, just to be safe, but HPDE open-track driving isn't demanding enough to require one with this differential. TECH TIP: Although any 8.8" carrier for a Ford will fit in an IRS Cobra's pumpkin, it's safest to use one specifically designed for the IRS. The side gears of an IRS-compatible differential have been machined with grooves for the snap rings on the inboard stubs of the halfshafts. A differential built for a stick axle car won't have the retention grooves, which means there will be nothing other than your axle nuts securing your halfshafts in place. Not a good idea. You should be able to install an IRS carrier in an SRA vehicle without issue, but you shouldn't swap the other way around without first having a shop machine the side gears with snap ring grooves. TECH TIP: Regardless of what you select as your preferred bushing material, be sure to secure both the front and rear of your pumpkin using bushings of similar durometer. If one end of the pumpkin is much more solidly located than the other, you'll risk breaking the front mounting eyes and/or the rear cover. Time for a quick word about gear lube. My differential gear oil of choice ever since I began participating in autocross and open track events has been Red Line Lightweight Shockproof. Shockproof is a genuinely unique gear lubricant that contains microscopic graphite particles in colloidal suspension to provide reduced drag and enhanced protection. The "lightweight" formulation is comparable to a 75W140 conventional gear lubricant, which is what both Ford and Torsen recommend. I've been filling my pumpkin with this gear oil for years, and the Shockproof formula has performed admirably despite the extremely harsh track conditions to which the car has been periodically subjected. Nevertheless, this lubricant should be AVOIDED by those who run differential pumps, coolers, or filters, because the formula's affinity for metal could result in clogging of those components. Consider yourself warned. Editorial Comment: I have heard and read opinions maintaining that polyurethane is unsuitable for use as a bushing material for locating the differential housing of an IRS Cobra. Much of the conjecture alleges that poly is too susceptible to heat breakdown, and that Delrin is better suited for use here. Let's consider this notion. The OEM Ford bushings are rubber, and the specified continuous high temperature operating limit of the type of rubber used in automotive bushings ranges from 220F to 250F degrees. However, polyurethane's operational upper bound can run as high as 275F, depending on formulation. By comparison, the Delrin material of which some are so fond has a specified continuous high temp operational limit of only 185F degrees, nearly 100 degrees BELOW polyurethane's upper bound! Bear in mind that all these temperatures are the specified continuous SAFE OPERATING limits for these materials, not their melting points. Automotive rubber and poly bushings have melting points around FOUR HUNDRED degrees, give or take a few. Delrin's MP is 350F. (For the record, the melting point of UHMW is even lower at 275F.) Obviously, pumpkins hot enough to break down poly bushings are
more than hot enough to destroy OEM rubber bushings, as well, and Delrin wouldn't stand a chance. So Delrin
is certainly NOT a more suitable material from a thermal standpoint. What's that you say? Delrin is
recommended for only the housing's rear bushing, which somehow remains COOLER than its front bushings?
Right. The notion that the housing's front bushings are subjected to higher operating temps than the back
one is shear nonsense. The pumpkin's front mounting ears and bushings are wide open to a cooling flow of
air, as you can clearly see in the photo above. The rear bushing receives relatively little airflow and
is completely encased in a steel sleeve that transfers conducted heat directly from the housing's cover.
So the rear bushing remains cooler than those in front by ... MAGIC?
Now, for the real showstopper. Ford specifies a MAXIMUM continuous
operating temperature of 230F degrees for its Trac-Lok differential. (I'm speaking of the actual
gear temperature, not the temperature of the housing, which will be lower.) Unfortunately, because the
Trac-Lok is a friction type limited slip design, its temperatures CAN exceed 230F during an extended
road course event. This is why smart road racers DON'T USE friction type limited slip differentials.
If you are running a Trac-Lok diff and you subject your car to frequent, extended severe duty,
such as open track events, you would be well-advised to add a differential oil cooler at the very
least. Better yet, switch to a cooler running, worm gear differential, like a Torsen. Otherwise,
your diff will probably be toast long before you destroy even OEM rubber bushings, much less poly.
Think about it. To break down rubber or poly bushings, your gear temps must be spiking WELL above
Ford's specified maximum safe limit for the Trac-Lok. Considering how well aluminum dissipates
heat, how can your pumpkin's case temperature become hot enough to damage the bushings if your diff
isn't getting even hotter? It can't. If your differential housing really is getting toasty
enough to trash your bushings, then you have problems much more serious than bushing material,
because your differential is self-destructing. QED Okay, so much for the thermal suitability argument, but what about
durometer? Isn't the pumpkin more solidly located with Delrin and/or aluminum than with poly? Yes,
obviously, but not as much more rigidly as you may have been led to believe. The "durometer"
of any material is a reflection of its resistance to deformation. The "Shore D" durometer
rating of Delrin is 83. Depending on formulation, polyurethane's Shore D durometer can measure as
high as 80, although most poly chassis/suspension bushings fall in the 60 - 70 range (about the same as a
golf ball). Still plenty stiff, considering rubber compounds top out well below 40. In other words,
poly bushings are MUCH stiffer than rubber, and only slightly less stiff than Delrin. As for aluminum,
you may as well be welding your housing directly to the car's chassis, since aluminum provides
absolutely NO isolation against NVH. The question comes down to how much rigidity really is enough here,
and how much is too much? As mentioned elsewhere on this site, chassis NVH will ALWAYS increase with
bushing durometer, regardless of the nonsense that some delusional fanatics may be peddling. This is
the physics of it, and with this in mind, you'll need to determine for yourself how much bushing
stiffness you really need or want. Although I've been quite satisfied with the level of performance
that poly bushings provide, you may not be satisfied with anything less than solid mounts for your
application. Fine. However, if that's the case, you may want to also invest in a kidney belt to
complete the theme. You will find a few websites (very few) that are littered with wild,
irrational exhortations proclaiming poly "sucks" or poly "has no place" in
automotive bushings. On those sites, you'll see urethane bushings characterized as "cheap"
or "crappy." Don't believe it. Most of the inflammatory rhetoric out there in Internet
Land is purely profit-motivated and nothing but a thinly disguised attempt to steer prospective
users toward specific products. The remainder of the slanderous remarks are offered up primarily
by a cadre of deranged cohorts, many of whom still run OEM rubber bushings under their own cars,
and so are really unqualified to offer legitimate commentary, even if they were so inclined. You may
have seen carnival sideshow videos on those websites portraying some nimrod jerking a control arm
wildly beyond its designed range of motion and completely disregarding the fact that
whatever effect the arm's bushings might have on its normal motion will be inconsequential compared
to those of its damper and a big-ass spring exerting SEVERAL HUNDRED POUNDS of resistance per inch.
You may also have heard or seen the vulcanization process, which is used to capture rubber
bushings in their shells, misrepresented as "binding" in an attempt to imply there's
something wrong with it when there really isn't. Nonsense, all of it. Cheap and crappy? Really? Which do you suppose is REALLY more expensive
and difficult to produce? Which requires more advanced technology? Aluminum and Delrin bar stock may cost
marginally more per bushing than the base materials required to produce a poly counterpart, but the
production of urethane bushings requires MUCH larger investments in equipment and tooling, as well as a
great deal more technology. If you own a lathe and a drill press, you can fabricate aluminum or Delrin
bushings in your own garage. And if you wanted your aluminum bushings hard coated (anodized) for some
reason, you could just send them out to a local shop. Just about every city has at least one shop that
can provide this service. Now, think about what it would take to make your own poly bushings. Producing
urethane bushings in your garage would be impossible. You couldn't even fit all the required equipment
in there. Even if you could, you'd need to bring in additional utility power just to run it all. Which
bushing material looks "cheaper" now? The bloated profit margins enjoyed by Delrin and aluminum
bushings make them more expensive for the end user, but they are certainly NOT more expensive to
produce. Think about it. Here is a photo of the equipment required to manufacture urethane bushings ...
And this is all that's needed to manufacture Delrin or aluminum bushings ...
Which looks like the bigger investment? Unlike the hysterical polyphobic tirades rampant
on a few websites, this Editorial Comment has endeavored to arm you with some hard numbers and verifiable
facts, and has presented a logical rebuttal to assist you in arriving at a RATIONAL, informed decision
regarding your bushing choices. Also, unlike the authors of many of those ridiculous polyphobic epithets,
this comment isn't motivated by any selfish agenda. I'm not trying to sell you anything, and I am no toady
of anyone who is. I'm just trying to help you avoid making what may be a terrible mistake. Buy and install
the RIGHT bushings for your car's
intended purpose, whatever that purpose may be. For all I know, even OEM rubber may be the right
choice for you. If you're looking for the smoothest, quietest ride for a boulevard cruiser, this
almost certainly will be the case. Regardless, don't just blindly jump on the solid bushing short bus,
because we all know what it says about you if you do. More importantly, you could end up quite unhappy
with what you've done, just like this poor slob: "Much louder. REALLY LOUD above 75mph. Would not
want to take this car on road trip." That's a real quote from a less-than-ecstatic new owner of
solid differential bushings, and his experience is not uncommon. Here's one of the replies he
received: "Yup. Did the same mods as you. Still have the hop and now
lots of gear noise too." Many other posts ran along the same vein. Of course,
the Internet tough guys who sully up the forums with their relentless intimidation don't really
care about that sort of thing, so don't expect any sympathy from them after you've followed their
BAD advice. One e-thug shot back the following rude and arrogant remark in response to the complaint
above: "These aren't luxury cars, if you want a quiet
ride go buy a Caddy!" Gee, that seems rather extreme, doesn't it? Surely,
there must be a less radical solution. How about simply replacing the ill-considered solid bushings
with a more compliant material? Gotta love those Internet tough guys - just chock full of empathy
and sensitivity, as well as great ideas for enhancing your driving enjoyment. NOT! Here are a few more complaints from others who made the mistake of installing
the wrong differential bushings in their street cars. Bear in mind that these are automotive
enthusiasts offering these comments, not Casper Milquetoast commuters: "After I had the rubber differential
bushings replaced with aluminum, I started getting a howl that starts at about 70mph and
gets louder." "Mine is horrible. REALLY LOUD after solid
bushings. Unacceptable. Sucks." "I took the cobra out tonight
for the first "real" test (highways speeds) and noticed that my cobra "clunk"
has gotten significantly worse since doing the install. Before it would only
really be noticeable in 5th and 6th but now I can feel it in every gear. It's
also a lot more violent. It sometimes would make me cringe because I felt like
the Driveshaft was going to break off." Positive reviews of aluminum and
Delrin bushings usually run along these lines: "... My only complaint is the
freaking noise on acceleration and deceleration, and cursing [sic] on the fwy
(gear noise), other than that I couldn't be happier." Hmm. It sounds to me like solid bushings would
be a great option for my primarily street-driven Cobra, as long as I don't plan on accelerating,
decelerating, or cruising very much. Count me in as soon as someone can explain to me how I will
be able to drive it without engaging in those activities. If it's a dedicated track car you're
modifying, maybe nothing but solid bushings will do. But if you stick them on any mostly
street-driven vehicle, you're likely to hate yourself - and your car - in the morning. Just
sayin'. Think of it this way, Delrin and aluminum are to bushings
as spools are to differentials. If you're a hardcore, nail-biting quarter mile fanatic
looking to go where no man has ever gone before, then you probably want a spool. The rest
of us will make do with something a little more street-friendly. Similarly, if you're a
zealous wannabe Fittipaldi with aspirations of of setting a new track record at your local
road course, you may want Delrin and aluminum bushings. The rest of us will get by with a
somewhat less brutal alternative.
DSS Level-5 Halfshafts & Hubs
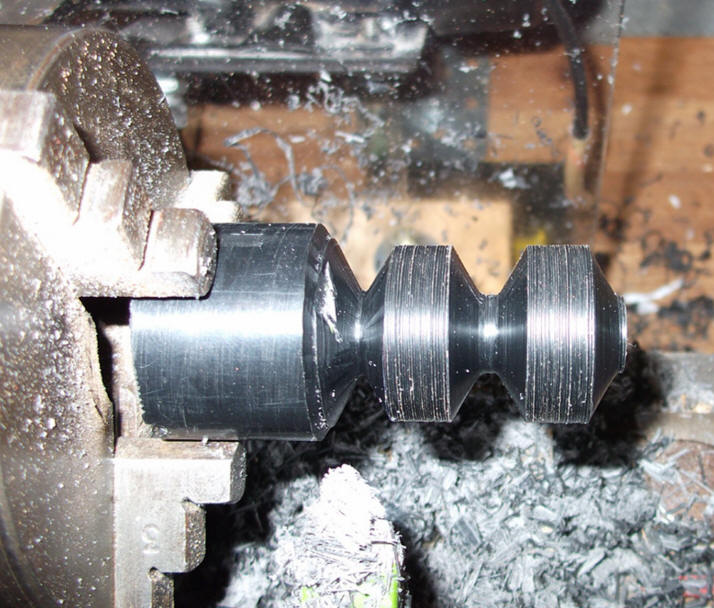
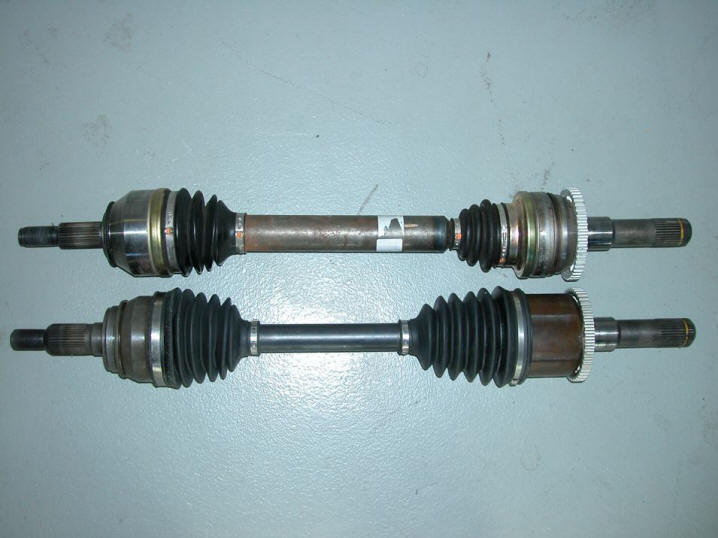
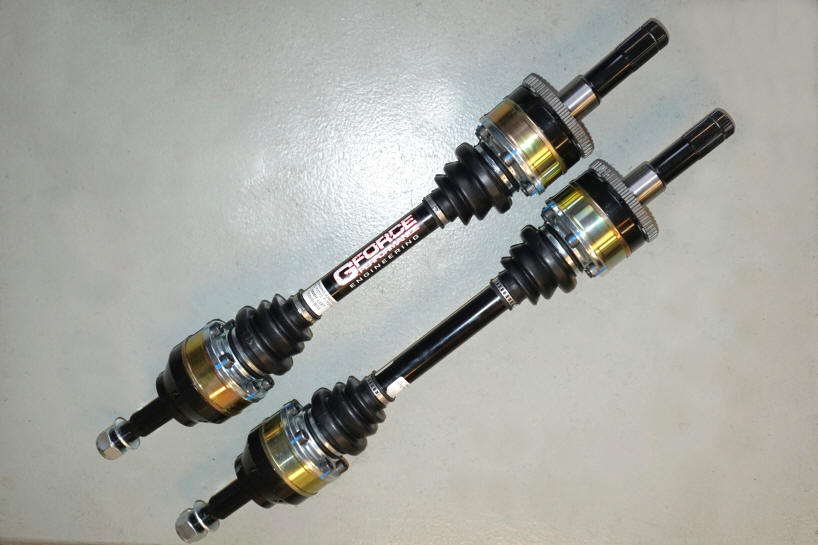
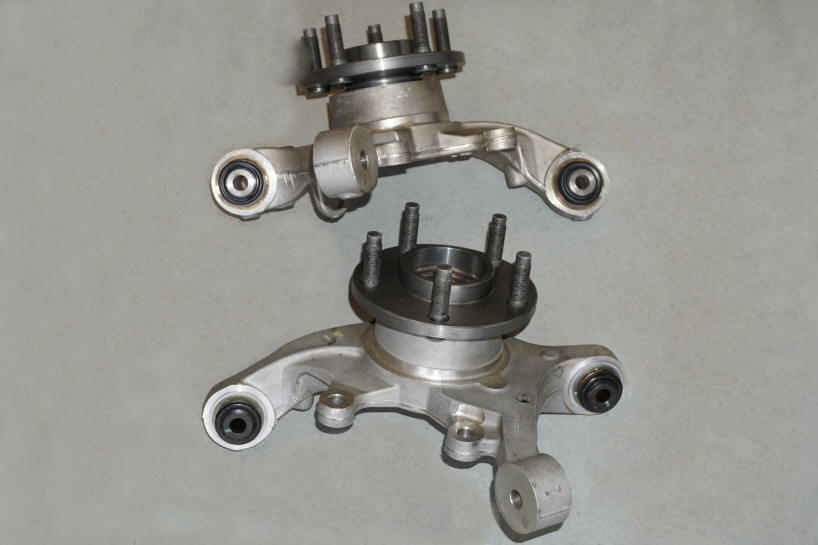
Having read numerous accounts of broken OEM halfshafts, I felt uncomfortable about continuing to run them after significantly bumping the torque capabilities of the Cobra by adding the twin-screw supercharger, so I decided to upgrade to a pair of Level-5 halfshafts from the Driveshaft Shop. Although the L-5's admittedly are overkill at Taz's power level, you can never tell what the future may hold. After all, a project car is never really finished, is it? Besides, my L-5's are actually a few pounds lighter than either the OEM units or the DSS L-2's, because the L-5 axle bars are manufactured from 300M steel, and so can be made with less material. (Because of its very high strength, 300M is also used for such applications as aircraft landing gear, high strength bolts, and airframe parts.) In the photo below, you can see the difference between a stock '01 halfshaft (top) and a DSS Level-5 fitted with a Terminator inboard CV and stub. Note that the diameter of the L-5's axle bar is considerably smaller than that of the OEM's. Also note that the outboard stub of the L-5 is much stouter than the OEM's. This is why the L-5's require custom hubs, which are included with the axle purchase.
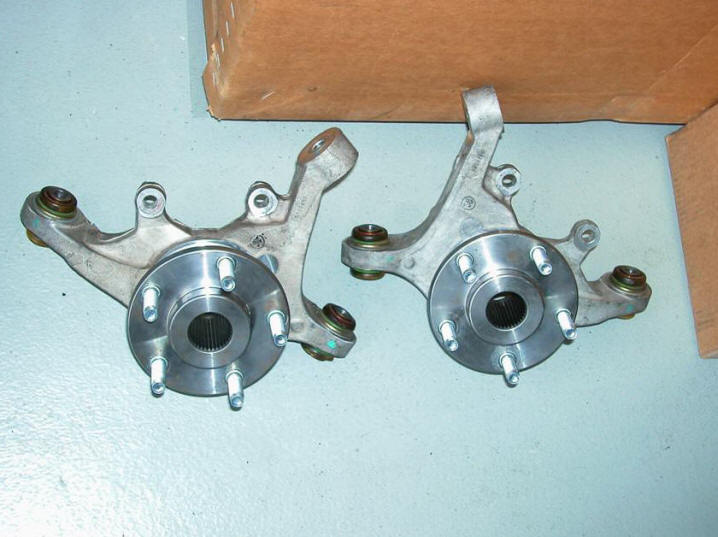
My L-5's weren't equipped from DSS with inboard stubs or inner CV joints, and I couldn't reuse my '01 inner CV's with them, because the OEM parts wouldn't mate up with the new axle bars. At the time, DSS didn't even offer these halfshafts complete end to end, and although L-5's can now be ordered with inner CV's as Pro-Level halfshafts, I was required to track down a pair of Terminator inboard stubs and CV joints in order to complete mine. I picked up my inner stubs from a misguided soul who was converting his Cobra to an SRA setup. His loss; my gain. TECH TIP: If you're in the Phoenix metro area, and you ever require service for either your steering rack or your halfshafts, I recommend Phoenix Rack and Axle (now combined with Dick's Driveshaft) to assist with your needs. After a brake hose rubbed through the outer boot on one of my axles, the folks there were kind enough to reboot the axle while I waited. Friendly people, first-rate service, and great prices - what more could a fair-haired lad ask of any business? Phoenix Rack and Axle also offers a number of other driveline services, including driveshaft balancing and custom work. Give 'em a try. You'll be glad you did. Although they didn't ship with inboard stubs, my L-5's did ship with a pair of DSS billet steel hubs and a couple sets of ARP wheel studs. The reason for the new hubs is that, as I mentioned above, the L-5 outboard stubs are much stouter than the stockers, with a higher spline count, so the OEM hubs can't be used with them. The photo below shows the DSS billet hubs already pressed into the OEM knuckles along with fresh Ford # 39DZ-1215-A wheel bearings, which were contributed to the effort by my friend Roy, who just happened to have an extra pair lying around.
I pressed fresh wheel studs into each hub prior to installing the hub in its knuckle. DSS provides stout 3-1/2" ARP wheel studs with the L-5 hubs to enable the assembly to pass NHRA track tech, which is great for those who must conform to the NHRA rulebook. But for aesthetic reasons, folks like me who don't need to meet those tech requirements would typically rather not run long studs and open lug nuts. Unfortunately, Ford OEM studs can't be substituted, because their .615" knurls are too small for the stud holes in the DSS hubs, which have been cut larger to accommodate the supplied ARP parts. I originally planned on simply having the ARP studs cut down to a length suitable for use with the factory lug nuts, but after doing a little digging, I discovered that Moser manufactures Grade 8 wheel studs in the same 1.75" length and 1/2"-20 thread pitch as the OEM studs, but with a .625" knurl diameter that would fit the DSS hubs. Score! The Moser studs are the ones you see pressed into the hubs in the above photo. Look for Moser part number 8368 if you'd like a set of these. TECH TIP: The correct method for installing wheel studs is to press them into the hub. The gang over at the Mopar Action website caution that pulling studs in with a nut and some flat washers will almost certainly result in over-torquing both the stud and the nut. I concur. In the absence of a press, driving the studs in with a drift and BFH is a suitable stud installation alternative, but pulling them in will weaken them, increasing the possibility of failure. Feel free to ignore this advice as you see fit. The world could certainly do with fewer ignorant, pigheaded people. If you'd like to have annotated copies of Taz's 2006 - 2007 driveline and suspension upgrade installation photos, including the photos you see above, just right click the link below and select the "Save Target As ..." or "Save Link As ..." option from the fly-out menu that will appear. This is a fairly large file (more than 5MB), so it may take a minute or so to download, but that's still preferable to the delays you would otherwise encounter trying to view the file in place via the Internet. 2006 - 2007 driveline & suspension upgrade installation photos (PDF)
2017 IRS Refresh
In the fall of 2017, Taz began to develop excessive play in his right rear hub, even though the axle nut was torqued to spec. I picked up a new hub bearing from the dealer, hoping the problem was just a failed bearing, but discovered when I pulled the spindle assembly that the problem was much more extensive than that. The hub had been destroyed, as well as the bearing. The video below shows how critical the situation had become by the time I pulled the spindle ...
The hub had already been partially pressed out in the above video, but SHEESH! I count myself lucky that corner didn't come apart on me while driving. There are a number of possibilities for the reason behind this carnage. At the top of my list of the usual suspects was the fact that my axle nuts had become quite loose several times before Ford got wise to the issue with the original axle retainers and replaced them with Nylock versions to prevent their backing off. Even though I had always checked mine fairly regularly, there had been a number of occasions prior to installing the new Nylock nuts when the hubs had begun to make audible chuffing noises during turns before I realized the nuts were loose again and broke out the torque wrench to crank them back to their 240 lb-ft spec. Those occasions may well have catalyzed the destruction of the bearings and hubs. When I contacted DSS about purchasing a new hub, I learned that my hub style was obsolete, having been replaced by a revised design that my axles wouldn't fit. The good news was that the outboard stubs on my half-shafts could be machined to fit the new hubs. The bad news was that the cost would be $250 per side for the machining plus a new hub, i.e. $500 plus shipping for both axles and hubs. After mulling over that prospective expense, I figured I may as well pick up a pair of Gforce Outlaw axles since I would have been on the hook for a major cash outlay just to update the L-5's to the current design. The bonus was that Gforce had followed GM's lead and designed their axles to minimize wheel hop by making the axle shafts different diameters. (Refer to the Wheel Hop Solution section of the Tech Docs page on this website for an explanation of why this works.) How could I resist? The Gforce axles use the OEM hubs, so I also needed a pair of those, and to play it safe, I picked up a pair of new loaded spindles, complete with bearings and hubs, instead of just bare hubs. Cha-ching! But, hey, in for a penny; in for a pound, eh? Here's a shot of Taz's new Gforce axles prior to their installation ...
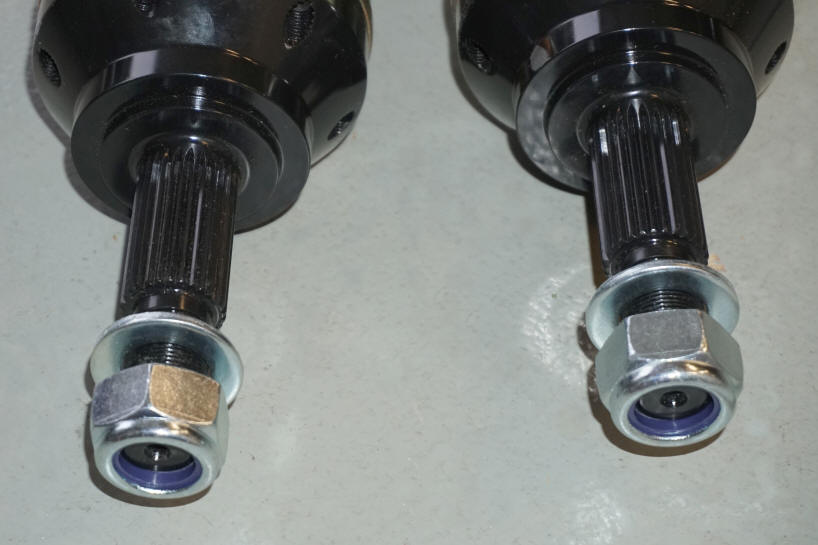
Note that the nuts and washers shown in the above photo are NOT the ones supplied by Gforce, because the retainers I received with my axles were non-locking, and I wasn't keen on experiencing this sort of drama again. I wanted locking nuts, but the Ford M24-2.0 locking nuts can't be used with these axles, which have finer pitch threads. Time for a little investigative work. In the end, I sourced the required Class 10 M24-1.5 axle nuts online from Bel-Metric as their P/N NNH24X1.5CLZ and 24mm 200HV, DIN 125-1A hardened washers from Grainger as their P/N 25DK65. Here's a close-up of the outboard stubs with the retainers and washers on them ...
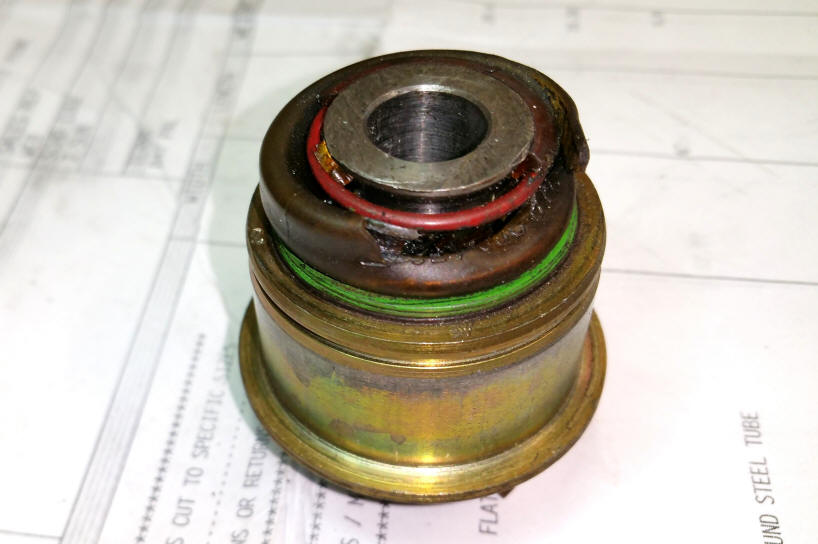
The boots of the OEM cross-axis joints on the New Edge Cobras are notoriously weak, and those on the C/A joints in my old spindles had been toast for some time. Below is a photo of the way one of my factory C/A joints looked after about 30K miles.
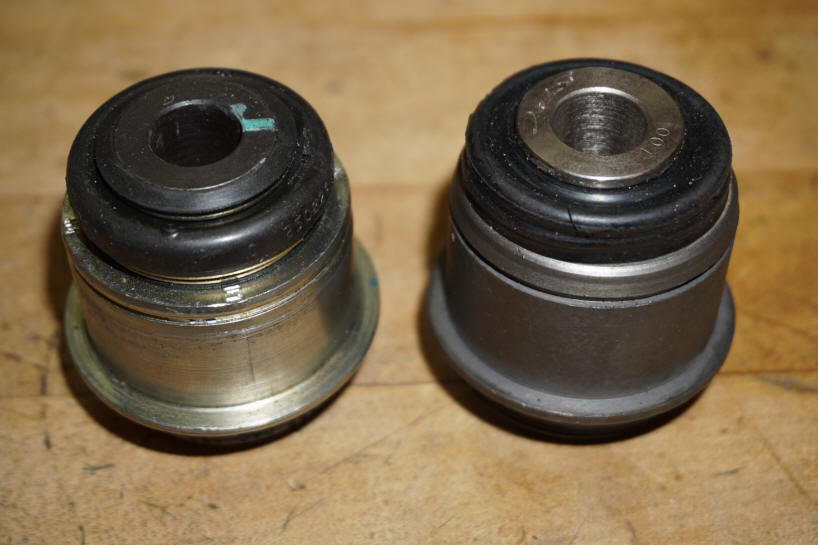
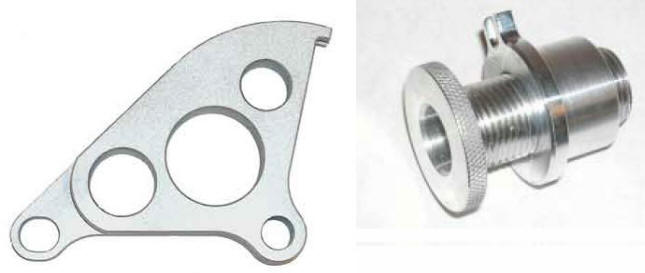
I had been preparing to replace the old C/A joints before the bearing/hub issue came to my attention, and already had a set of SPC Performance replacement C/A joints on the shelf, so I didn't really need the joints that had been preinstalled in the new spindles. Not only are the SPC joints stouter than the OEM parts, they are also fitted with snap-on rubber boots that are easily replaceable. Although I could have left the OEM C/A joints in the new spindles until their boots failed before replacing them, I decided to go ahead and swap them out for the SPC joints before installing the spindles in order to save myself some time and effort later. Below is a shot of a new OEM take-out (left of photo) and an SPC C/A joint side by side. The OEM boot is thin, squishy material, very similar to a ball joint boot. The SPC boot isn't. It's thick and relatively rigid...
Although it is possible to swap the spindle C/A joints without a press by using assorted cups, washers, and nuts/bolts, I recommend using a press. This will help you to ensure that the new joints go into those aluminum eyes nice and square. You could gall the aluminum otherwise, and then you'd have a devil of a time getting the joints in straight. My press is an inexpensive 20-ton unit from Harbor Freight, but it does a fine job, so swapping the joints on my new spindles was a piece of cake. TECH TIP: If you pick up a set of SPC C/A joints for your own spindles, there's something you should know prior to installing them. As I discovered while test fitting the first one in a spindle, these joints are very likely to have slight flares along either side of their snap ring grooves (I measured an increased diameter of 0.03" along both sides of the grooves on mine, for a calculated 0.015" flare all the way around). Theses were probably introduced when the grooves were machined into the barrels. It's a good idea to file down the flares prior to pressing the joints into your aluminum spindles. This will minimize the amount of material shaved from the spindle eyes during installation. I just used a bastard file to take down the flares on mine. Below is a photo of an SPC joint that I've already trimmed next to one straight out of the box. The boots on the trimmed joint have also been coated with Sil-Glyde to help preserve them, which is why they look shinier.
TECH TIP: The SPC kit includes a couple of cylinders of different diameters to facilitate the swapping of your C/A joints. The smaller tube, which is used on the back side of the joints, fits rather loosely over the boots. Before pressing out each old joint, wrap its boot with enough tape to keep the tube centered on the joint. If the tube is allowed to move off center, it can catch the edge of the spindle eye and damage that spindle. Here is a shot of the new spindles that I picked up for Taz. The one at the top of the photo has already had its OEM C/A joints replaced with the SPC parts, but the swap has not yet been performed on the bottom spindle...
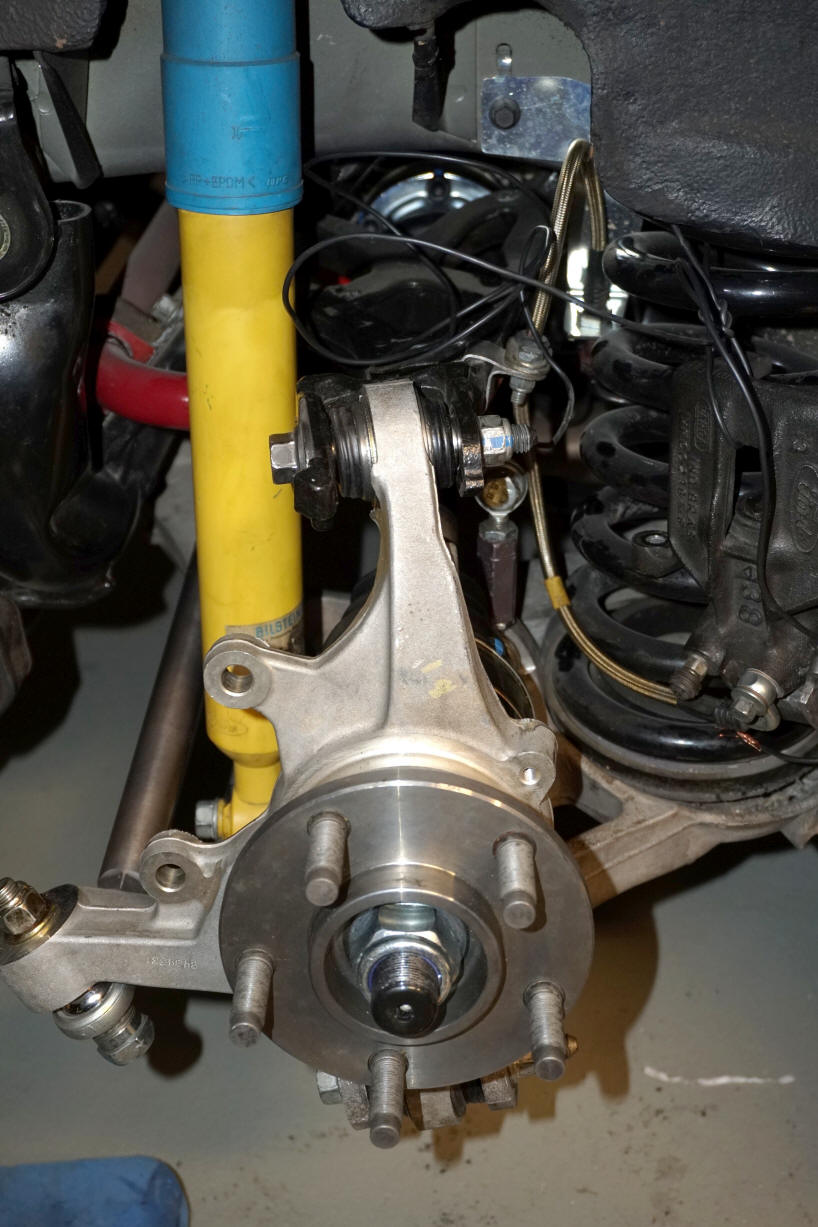
TECH TIP: I had no issues with the snap rings supplied in my SPC C/A kit, but a few others have complained about these rings breaking during installation. My buddy Joe broke two of the ones provided with his kit, so he replaced them all with some from Grainger that he says fit perfectly, although they are a slightly different design with eyes for snap ring pliers. Also, I have located replacements of the same speared design as those provided with the kit at Huylett.com that have dimensional specifications identical to those in the kit, just in case I ever need to replace them. These are listed as Eaton # DUSC-0916R. After the SPC cross-axis joints had been pressed into both new spindles, I installed the spindles along with the Gforce axles. Below is a photo of the right rear just prior to reinstalling the brake parts.
TECH TIP: To minimize the possibility of damaging the side seals in your differential case, be sure to liberally coat the splines on the inner stubs of your axles with gear lube prior to inserting them into your pumpkin. Applying some anti-seize to the splines on the outboard axle stubs prior to installing your spindles is also a good idea, as this will facilitate pulling them into the hubs with their retainer nuts. Taz's left hub hadn't been making any noise during right-hand turns (the hub or bearing on the opposite side is always suspect when hearing noises while turning either way), but I discovered when I removed the spindle that the bearing on this side had leaked considerable grease out onto the back of the spindle, and a tiny bit of play had already developed in this hub, as well. I believe the bearing/hub deterioration in the left spindle was minimal compared with the right side, because the left axle retainer had been far less prone to back off with the old non-locking nuts than the right one had been. With respect to my specific setup and the other aftermarket parts installed on my Cobra, there is one minor hitch with these new Gforce half-shafts from a suspension perspective. At full droop, the boots on the outboard CV joints of these half-shafts rubbed against my Maximum Motorsports adjustable end links when the end links were attached to the "stiffer" sway bar anchor holes in my Eibach sway bar. Consequently, I was forced to use the "softer" end link anchor holes, i.e. the ones closer to the ends of the bar, to avoid potential damage to the boots. With the end links attached at the holes for the bar's milder setting, there's enough clearance - barely - to ensure the boots remain intact, as shown below...
I wasn't thrilled about needing to make this end link adjustment, because the car's turn-in had been perfect while using the stiffer setting with the old DSS half-shafts, but there may be a solution. MM has redesigned the sleeves on its end links since I bought mine. They are no longer hexagonal blocks along their entire length, as shown above, but now neck down to a cylindrical shape along most of it. This new sleeve design may provide enough clearance for me to revert to the stiffer setting for the sway bar. Maybe, I'll invest a few additional bucks to find out. Make no mistake. The new Gforce half-shafts more than offset this one minor quibble by bringing very significant improvements over the L-5's - and the OEM Terminator half-shafts, for that matter - to the table. One improvement that the Gforce axles offer is that they really do appear to have conquered the infamous Cobra wheel hop. I have intentionally tried to induce hop more than once since installing mine, and they just chirp and spin every time. Nice! Another great perk that came along with the Gforce half-shafts was the elimination of my "Cobra clunk." I hadn't experienced that ridiculous clunk with my original 2001 half-shafts, but did acquire it after installing the DSS L-5's, because they required me to use OEM Terminator inner stubs with the tripod C/V shells. There was never much doubt in my mind that those tripods were the source of that annoyance, and I'm now dead certain of it. Try as I may to provoke a clunk with the Gforce axles, I cannot. :)
|

 \
\