![]()
![]()
![]()
![]()
![]()
![]()
![]()
![]()
![]()
![]()
![]()
![]()
![]()
![]()
![]()
![]()
![]()
![]()
![]()
|
|
|
|
Boost-A-Pump
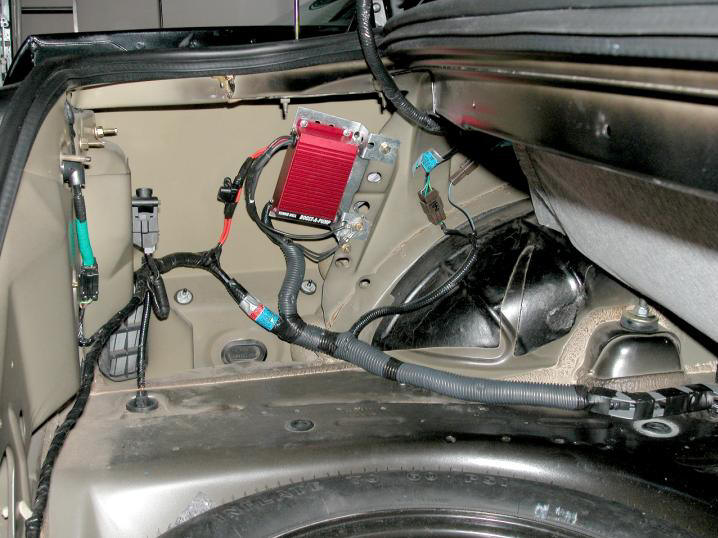
Kenne Bell supercharger kits generally include Boost-A-Pumps to satisfy the greater fuel delivery demands of supercharged vehicles. Mine was no exception. The Boost-A-Pump is an ingenious little amplifier that bumps the fuel pump voltage to about 17.5 VDC. This enables the pump to deliver the required fuel to the engine using a shorter duty cycle, which increases its headroom and capacity. In a New Edge Mustang, the BAP installs in the trunk, near the fuel pump driver module. I wasn't particularly thrilled with KB's directive to secure the unit to the inner fender with a couple of self-tapping screws, so I fabbed a pair of Z-brackets for it from some galvanized stock. You can see my installed unit in the photo below.
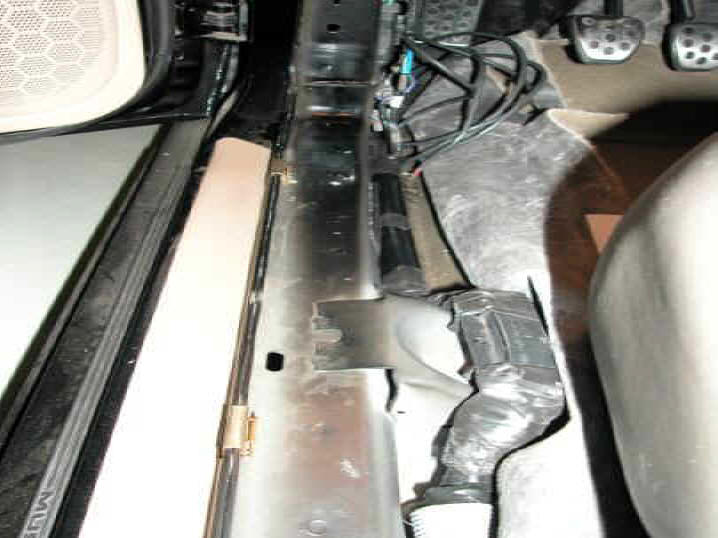
Another variation between my own BAP installation and the KB instructions was that I slit the interior factory wiring loom open and inserted the BAP control cable into it, rather than just stringing the cable alongside, as directed. The photo below shows my BAP control cable already installed in the factory loom and ready to be pulled through the main cable grommet in the car's firewall.
NOTE: A few have complained of drivability issues that they attributed to the BAP's operation. However, the unit goes about its business unnoticed in the vast majority of installations. My own BAP performs its duties invisibly, and I've never experienced any of the surging or bucking of which some other BAP users have complained.
Terminator Fuel Injectors
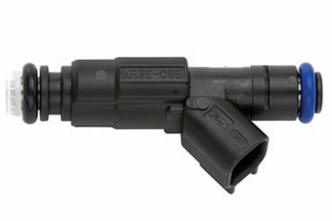
Higher capacity fuel injectors are mandatory for making significant increases in an engine's power delivery. Since the stock injectors weren't capable of supporting the power level produced by the twin-screw compressor, my Kenne Bell supercharger kit included a set of Ford Racing #397-M-9593-M39 injectors. These are EV6 type injectors w/ USCAR connectors, as pictured below.
Each new injector is rated at 39 lbs/hr, compared to 23 lbs/hr for each of the Cobra's stock stock injectors. In addition to being capable of supporting higher power levels, the greater flow rate improves reliability by reducing injector duty cycles. TECH TIP: If you want 100% plug-and-play replacement injectors, look for EV-6 injectors with USCAR electrical connectors. EV-1 injectors won't work at all for this application, and if you make the mistake of buying injectors with Bosch connectors, you'll need adapters to plug them into the wiring harnesses.
KB F1050 Pump
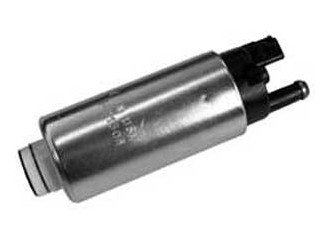
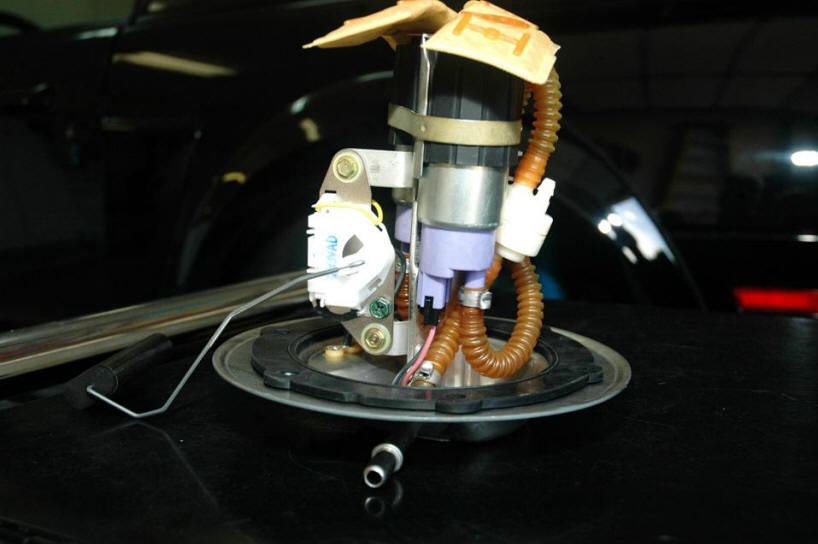
When I ordered Taz's Kenne Bell supercharger kit, I also ordered KB's model F1050 fuel pump. Even though KB maintained at that time that the stock '01 Cobra pump would support more than 450 RWHP when combined with a BAP, I didn't like what I saw when I crunched the numbers for myself. By my calculations, the stock pump was going to fall short. Even if I was wrong and it didn't, it would be marginal, so I threw an F1050 into my shopping cart, metaphorically speaking, along with the supercharger kit. This fuel pump replaces the OEM pump installed inside the fuel tank, so a couple of friends assisted me in dropping the tank and swapping pumps. Thanks to their help, the swap took no time at all. In fact, it went so fast that I completely forgot to snap a single photo of the changeover. Oh, well. For those of you who are curious about what an '01 Cobra fuel pump looks like, I've provided a photo below of a generic pump that looks much like both the OEM pump that I removed and the KB F1050 that replaced it.
TECH TIP: A pint of water weighs about a pound. Gasoline has a lower specific gravity, so a pint of petrol weighs a little less, but not much, so be sure to run your fuel level down as low as possible before before dropping your fuel tank. This will make your pump swap much easier. Although the F1050 fuel pump will not support the lofty power levels that some pumps can handle, this pump is capable of delivering a significantly higher volume than the stock pump, and this one enjoys the advantage of being a completely plug-and-play upgrade. KB rates the F1050 at 217 LPH without a Boost-A-Pump in the system to bump the drive voltage, and 317 LPH with one. In plain English, this pump/BAP combination will support over 500 RWHP, which is more power than I probably will ever try to make with Taz, considering the car's acceleration is already traction-limited on street tires, and I'm not an avid drag racer. As it turns out, my estimate that the OEM fuel pump would come up short appears to have been correct. Many of the stock pumps couldn't safely support even 400 RWHP, much less 450. Most dyno charts of KB Cobras with stock pumps that I've seen look like they're running out of pump on the top end, even with a BAP. NOTE: The Kenne-Bell F1050 pump is no longer available, but there are a number of PWM-type pumps from Ford that can be substituted when performing a fuel pump upgrade. Among them are the Aviator and Ford GT Supercar pumps. TECH TIP: All '99 - '04 Cobras use PWM-controlled fuel pumps. This is the type of pump required for proper operation of the factory returnless fuel system architecture. Unless you're converting your fuel system to a return-style setup, be sure to use this type of pump when upgrading to a higher capacity unit. Otherwise, you'll suffer premature pump failure. 2012 Update: The Kenne Bell fuel pump did an excellent job for me for 7+ years. It was all the pump I needed, and I'd still be using it if I hadn't switched in 2012 to a fuel tank that didn't include the basket required for an '01 pump canister. (See below.) Installation of the new tank required switching to a Terminator pump assembly, as well.
Sumped Tank & Terminator Pumps
Other than small nylon baskets in which their fuel pumps were secured, the fuel tanks of New Edge Cobras contained no provisions for reducing fuel slosh or preventing pump starvation. When the Terminators came along, their fuel tanks were equipped with baffles to mitigate pump starvation during hard acceleration and cornering, so they quickly became popular upgrades for many owners of earlier Cobras and other high-performance Mustangs. The twin fuel pump assemblies with which the Terminators were also equipped became an equally popular upgrade for many seeking enhanced fuel delivery, and these were often bought together with the tanks. However, for some inexplicable reason, Ford Racing suddenly discontinued the tanks after just a few years, despite their broad popularity. Although a Terminator fuel tank had been on Taz’s wish list for some time, it had been a fairly low priority item, and I hadn’t gotten around to scoring one before all the new tanks unexpectedly vanished from the marketplace. Consequently, like many other force-fed Mustang owners, I needed to remain careful to prevent the car's fuel level from falling below the quarter-tank level or risk catastrophic failure. This artificially limited Taz’s range, preventing me from making lengthy forays into unfamiliar territory. By the the spring of 2012, when I finally began searching for a tank upgrade in earnest to extend Taz’s cruising range, even used Terminator fuel tank prices had risen to absurd levels. The void created in the market by the demise of the Ford Racing tanks had resulted in the prices of decent used examples skyrocketing very quickly, and I was reluctant to pay twice what a new tank had originally run for the privilege of owning a used one. Furthermore, although I was unaware of the fact when I began looking for my own solution, the Terminator fuel tank design, while much better than those of the other New Edge Mustangs, was less than perfect. Despite the tank’s internal baffling, many of its owners still experienced pump failures resulting from cavitation. To eliminate the problem, some owners simply migrated to external pumps, sumped tanks, and return-style fuel systems. However, a significant number wished to retain their original returnless systems and drop-in pump configurations, and they began looking for aftermarket tanks that would enable them to do so without being forced to periodically replace their pumps. Personally, I was just seeking a more capable fuel tank than the one I had for less than the going price of a used Terminator tank when I discovered that Glenn’s Performance had begun working on a new design for an internally sumped fuel tank that would support the use of a factory style drop-in pump assembly. It was from Glenn’s that I learned of the cavitation issues with the OEM Terminator fuel tanks and discovered I had ended up at the same doorstep as several Terminator owners, so I placed my name on the tank’s waiting list with theirs. Near the end of March, I received a call from Glenn's informing me that development and testing had been completed, and that a tank with my name on it was ready to ship. I supplied my credit card information, and my new fuel tank arrived a couple days later. To avoid fitment issues, the folks at Glenn’s had wisely started with a standard replacement tank from a reputable OEM supplier. They cut a rectangular section from the tank’s bottom, beneath the fitting for the fuel hat, and replaced the section with a panel to which a complete sump assembly had already been welded. The left panel of the composite graphic below shows how the sump section looks from below the tank, and the image at the right shows portions of the sump frame and feed tube w/ vent pipe. (The notch is for the level sender's float arm.)
As you can see in the image at the upper left of the next composite, I first prepped the new tank for installation by applying a couple cans of spray undercoating to its top and side faces to prevent it from sounding like a tin can. Then, I cut and affixed a few sheets of peel-and-stick sound deadener for a little extra insurance (upper right image of the composite). Finally, I topped it off with some high density foam to preclude any rattling or squeaking after the tank was installed (lower left image). The completed tank, ready for installation, is shown in the image at the lower right.
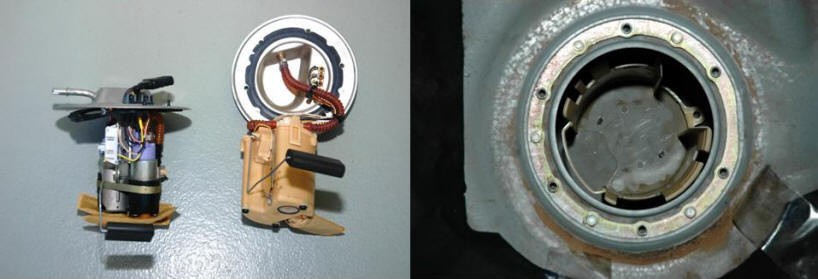
As soon as I had prepped the exterior of the fuel tank, my buddy Jim came by to help me with the tank swap. Our plan was to drop Taz’s original tank and quickly transfer the hat, all the evap system hardware, and pump/level sender assembly over to the new one. Before installing the new tank, we’d take advantage of the unobstructed sway bar access to quickly swap out the factory rear bar for a stouter bar that I had picked up a couple months earlier. Then, we'd bolt up the new Glenn’s tank assembly. That was the plan. Quick and easy, or so we thought. That’s not the way the scene played out, and a week transpired between the photos in the top and bottom panels of the above composite. It was painfully obvious as soon as we popped the fuel hat off Taz's OEM tank that the '01 fuel pump assembly wouldn’t transfer directly over to the new tank, because the Glenn’s tank had been designed with a Terminator pump assembly in mind. The Terminator assembly (the one at the left in the left panel below) is attached to a bracket that has been secured to the underside of its fuel hat, whereas the ‘01 Cobra's pump assembly (the one on the right) snaps into a nylon basket (visible in the right panel photo below) affixed to the floor of the tank. The '01 pump assembly is only loosely tethered to its fuel hat by a fuel hose and four wires, and it cannot be secured in place without that pump basket. I remembered the basket from Taz’s 2004 KB pump installation, but I presumed the transfer would be very straightforward because my contact at Glenn’s had offered no caveat when I'd mentioned my intention of reusing the ‘01 assembly. I was wrong.
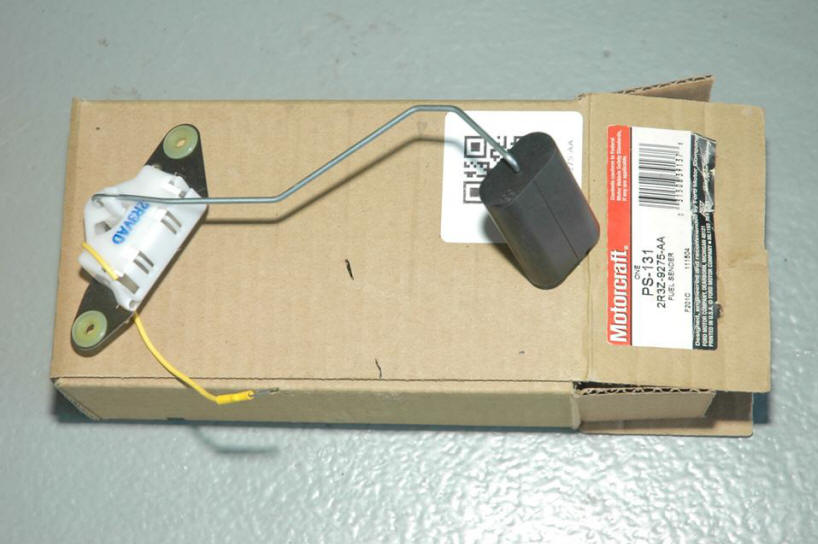
The '01 nylon pump basket had been constructed with a tin bottom that had been tack welded to the floor of the OEM tank. Removing it would be risky business at best, and there was a very good chance I’d damage it in the attempt. Then, there was the question of how to anchor the basket inside the new tank. After considerable cogitation and rumination, I elected to take the path of least resistance by picking up a Terminator hat/pump assembly in the used market and installing that in the new tank. This way I could leave the basket inside the old tank, reinstall its pump assembly, and recoup some of my project expenses by selling the whole works to someone looking for an OEM style '99/'01 Cobra tank/pump setup with an upgraded fuel pump. I quickly found a good, low mileage example from an '04 (the one shown above) and bought it. The Terminator hat/pump assembly was sans level sender unit, so I picked up one of those (pictured below) separately and mounted it on the assembly.
After I had added the level sender to the hat/pump assembly, I was able to drop the assembly into the new tank and install the tank in the Cobra in just a couple hours. TECH TIP: The level sender's mounting bracket contains insulating grommets. Since the sender is a rheostat, it needs a ground connection. If you don't properly ground the bracket, your fuel gauge will not work correctly. I recommend tapping the hole just below the sender's top mounting grommet and anchoring the fuel hat's white ground wire there with a suitable screw. Refer to the photo below. The hat/pump assembly is inverted in this shot, but it clearly shows the details. The green hex screw is the one I added.
TECH TIP: Attempting to drop the pump assembly into the Glenn's tank (or the OEM Terminator tank for that matter) with the level sender's float arm in its normal operating position can result in damage to the sender and/or float arm. The shop manual recommends unsnapping the arm from its nylon mount and replacing it after the assembly has been partially installed. I found it preferable - and much safer - to remove the bottom sender bracket screw (7mm hex) and loosen the top one enough to enable me to rotate the sender just a little. After I had the assembly far enough into the tank, I replaced the fastener I had removed and tightened both. Once I had finished securing Taz's new tank, it was time for the acid test. I had saved the fuel from the OEM tank in a jerry can, so I poured this into the Glenn's tank and checked for leaks. Then I fired up the Cobra and quickly confirmed that Taz’s fuel pressure was okay and that the fuel gauge was indicating the correct level before dropping the car down off the jack stands and driving to my local Chevron to fill it. The needle on the fuel gauge read just past the full marker after the fill-up, indicating the new level sender was working properly. During the drive, I also performed a couple short WOT blasts to check the system's fuel pressure and A/F ratio. Both were good, so I’m calling the operation a success.
|